
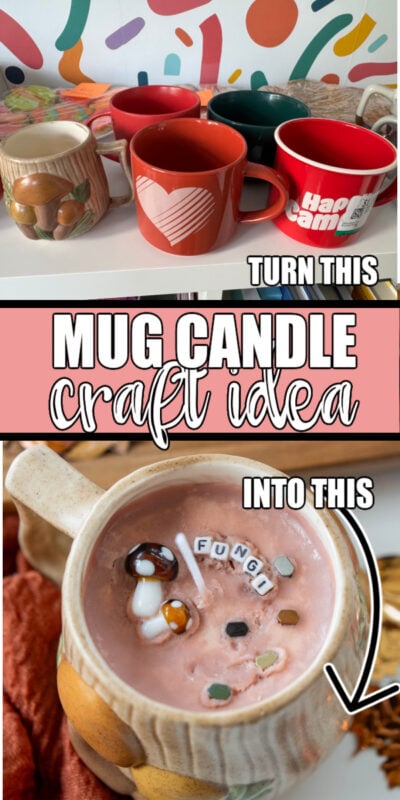
Make a custom mug candle in minutes with this simple craft that’s perfect for girls nights, craft nights, and more! We hosted a girls night where we all made our very own mug candles, and it was one of the best fall parties ever!

Want to save this Idea?
Enter your email below and we’ll send this idea straight to your inbox (plus you’ll receive tons of fun weekly ideas from us!)
Candle Mug Making Craft Night
There’s something about fall that just makes me want to craft and make all the cozy things. Over the past few years, we’ve hosted craft nights to make sweater pumpkins, cozy sweatshirts, and even rope pumpkins!
When we were looking for supplies for another craft night, we saw these cute Halloween spooky mug candles, but they were like $25 each and not the colors or styles that we wanted.
But we loved the idea – so we bought a bunch of mugs at a thrift store, grabbed candle making supplies, and tested out the idea a couple of times at home to make sure it worked! Spoiler alert – it did!
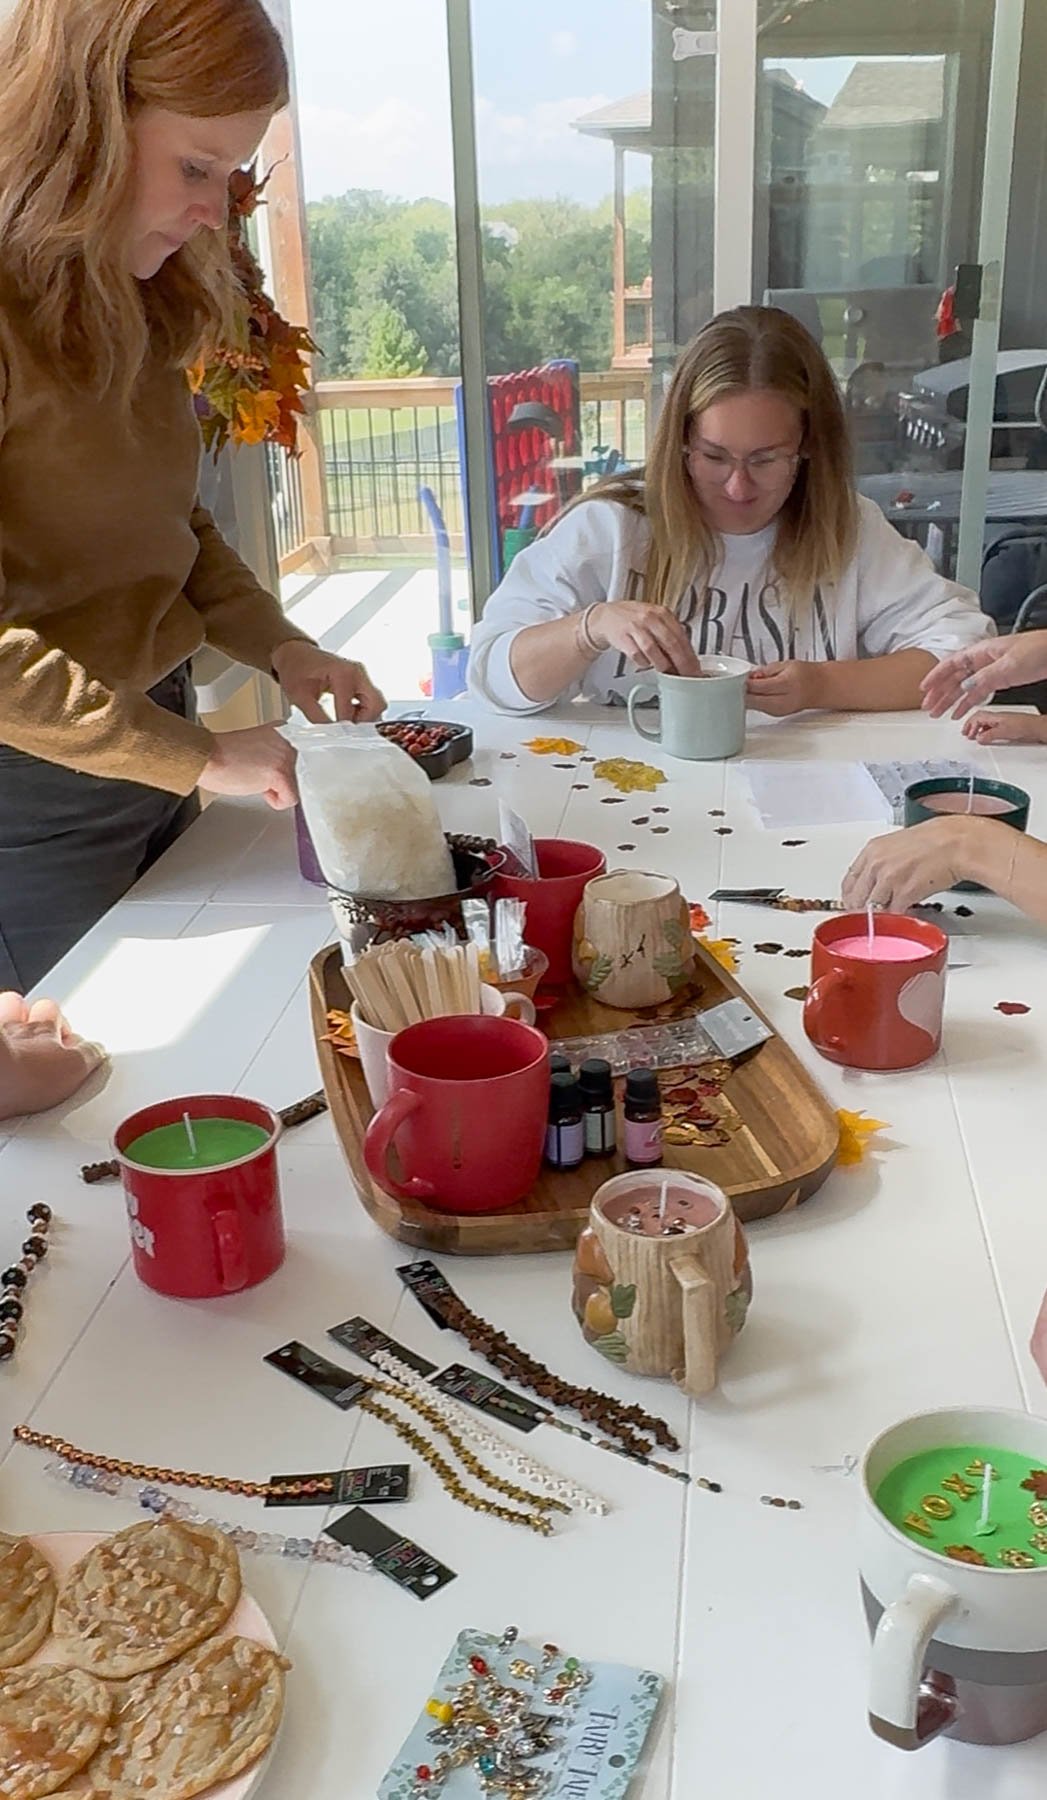
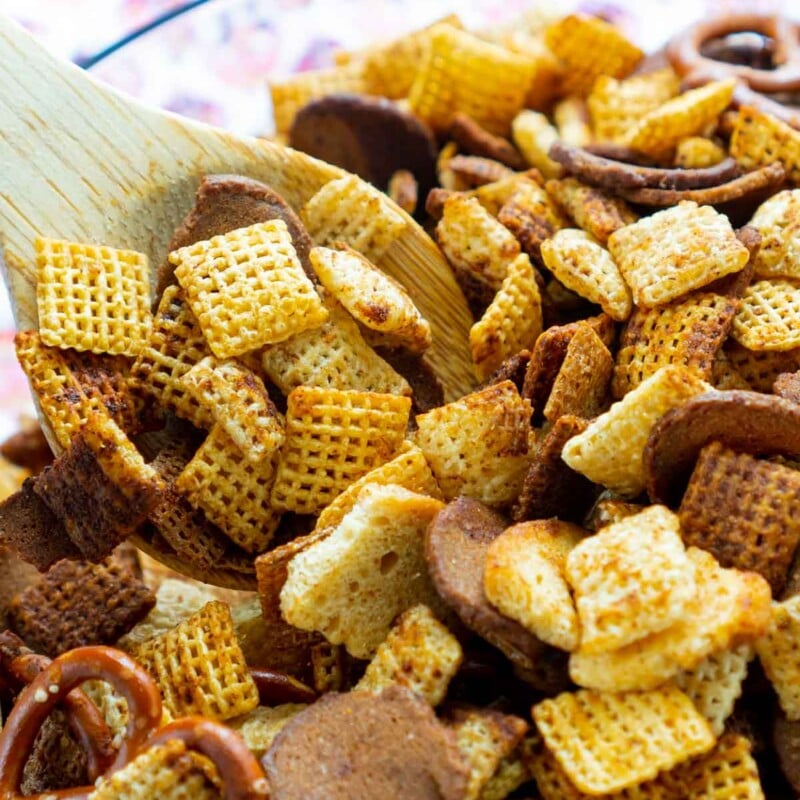
Once we knew the craft worked, we invited a bunch of our girlfriends over and had our own make your own mug candle craft night. We ate all sorts of fall treats like fall snack mix, pumpkin snickderdoodles, and of course drank some spiced apple cider. You can’t have a fall party without a fall drink!
Whether you want to do this on your own at home or invite people over for a fall craft night, you can use our step by step tutorial to create the cutest, coziest, candle crafts ever!

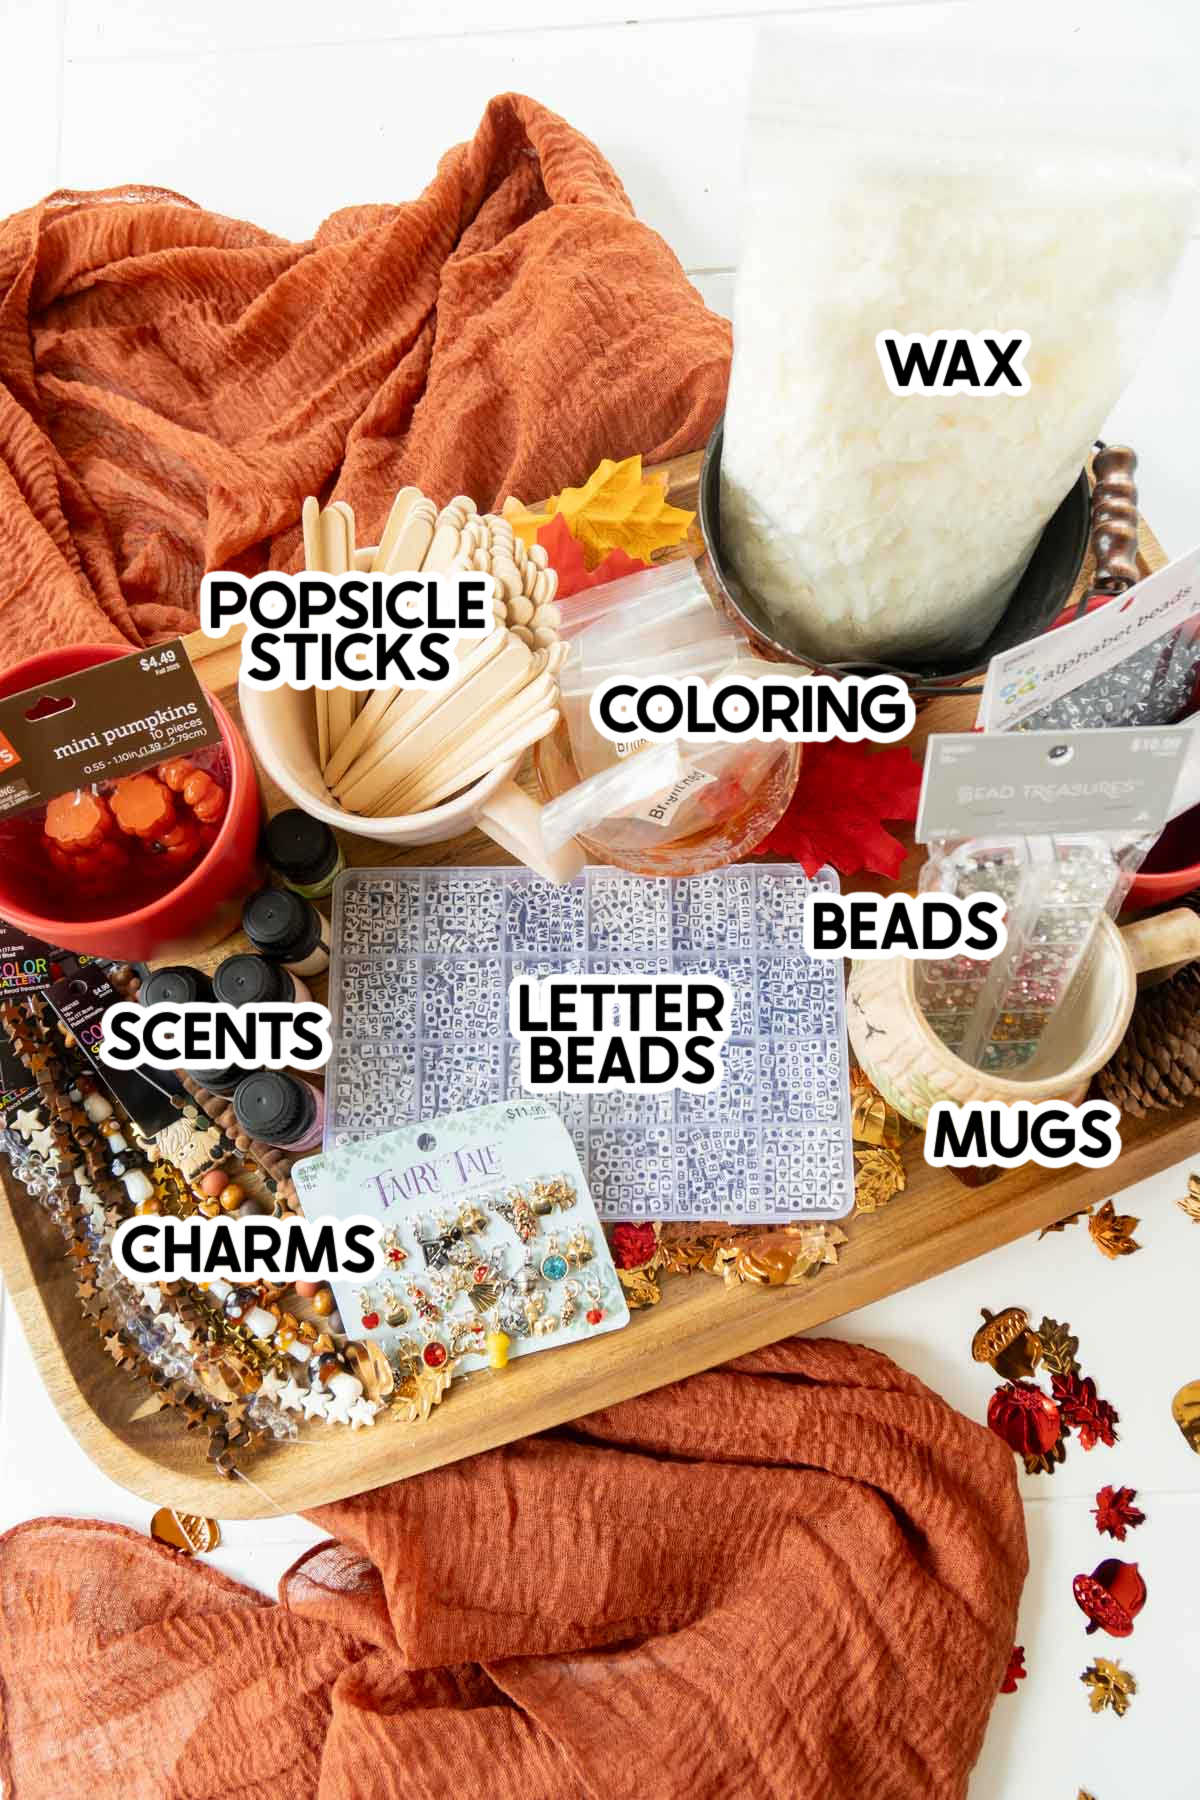
Supplies

Supply Notes
To be completely transparent, we ordered this candle making kit for our party. It was probably overkill and way more than we needed, but it also meant that we knew we had everything we needed for as many people as we wanted. It also included instructions for making candles, which was super helpful since we had never made homemade candles before! Oh and it also included the amount of wax you needed per ounce, which was also super helpful!
If you want easy, go with a candle making kit – just know you might have supplies leftover for another candle craft later. If you want to get just what you need, I’ve included the supplies below. But know that after you add up the cost of all of these things, the price of the candle making kit ends up being cheaper in most cases!
Supplies to Make Candles
- Candle wax – we used a soy wax and it worked great! Even if you get a candle making kit, you’ll probably need to purchase extra candle wax to go with it because the mugs hold quite a bit of wax!
- Wax melter – this heats up, melts, and keeps the wax heated.
- Candle scents – these are totally optional, I’m actually a no-scent person but if you want scents, you can grab a pack with options to choose from. Or just use essential oils if you have those.
- Candle color dye – food coloring won’t work, we tried. Buy colorings designed for candles (and other crafts). One of the colors should be enough for a couple of candles, depending on how bold of a color you want.
- Candle wicks – make sure they also come with stands to hold the wicks in while the wax cools. If they don’t, you can use two chopsticks as well as you’ll see we did with some of ours!
- Old can – much like bacon grease, wax can be tricky to dispose of. Saving an old can is a simple solution for cleaning it up without clogging your drains.
- Kitchen scale – you can do it without this, but it was really helpful in knowing how much wax each candle needed (amount of liquid it holds = amount of wax needed).
- Popsicle sticks – use these to stir the candle scents and colors into the wax so you don’t dye or melt spoons. Then use the others to make this cute scarecrow craft!
Supplies to Make theMug Candles
In addition to the actual candle making supplies, you’ll need the following to turn them into mug candles!
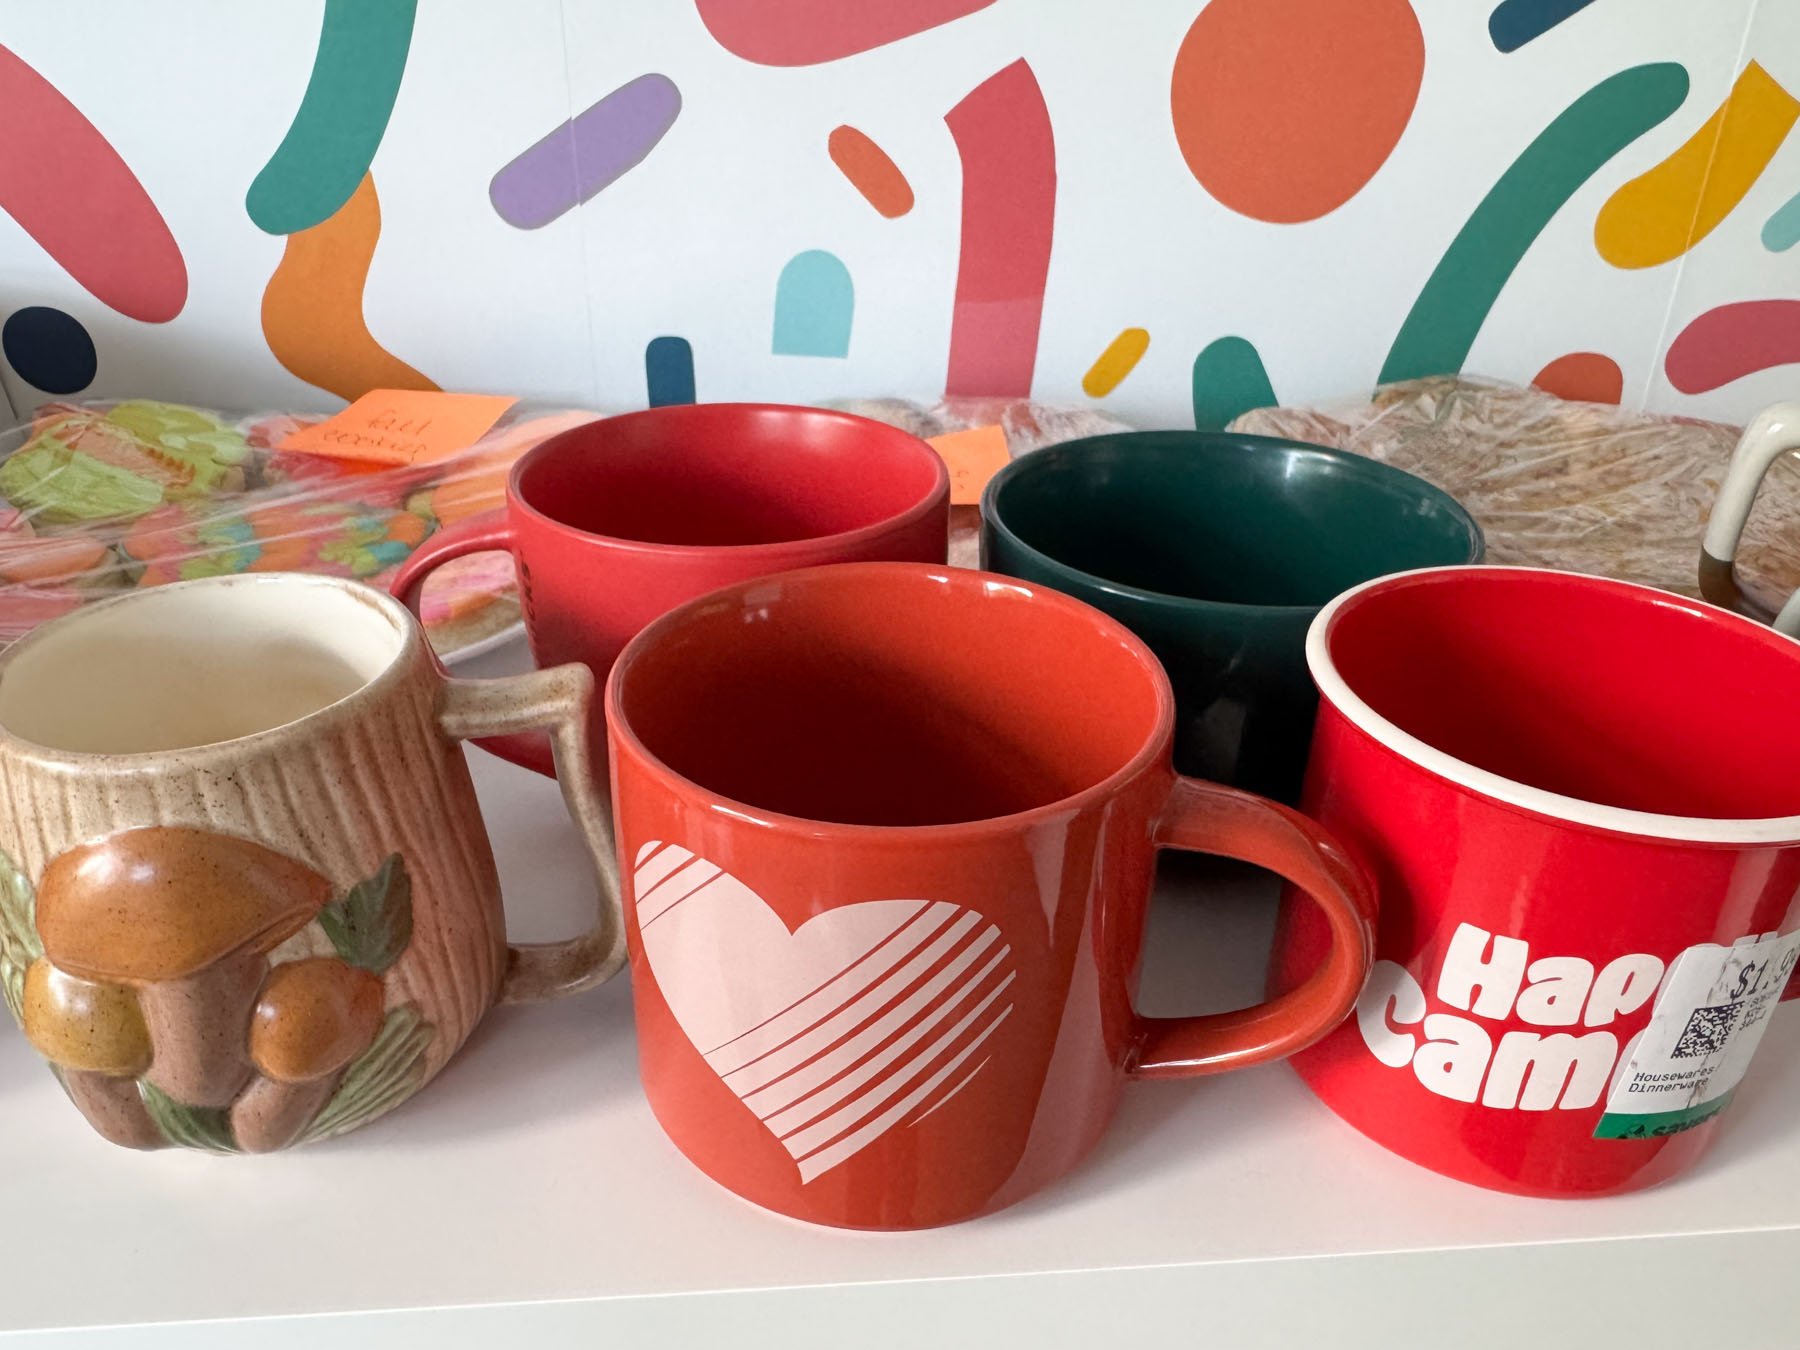
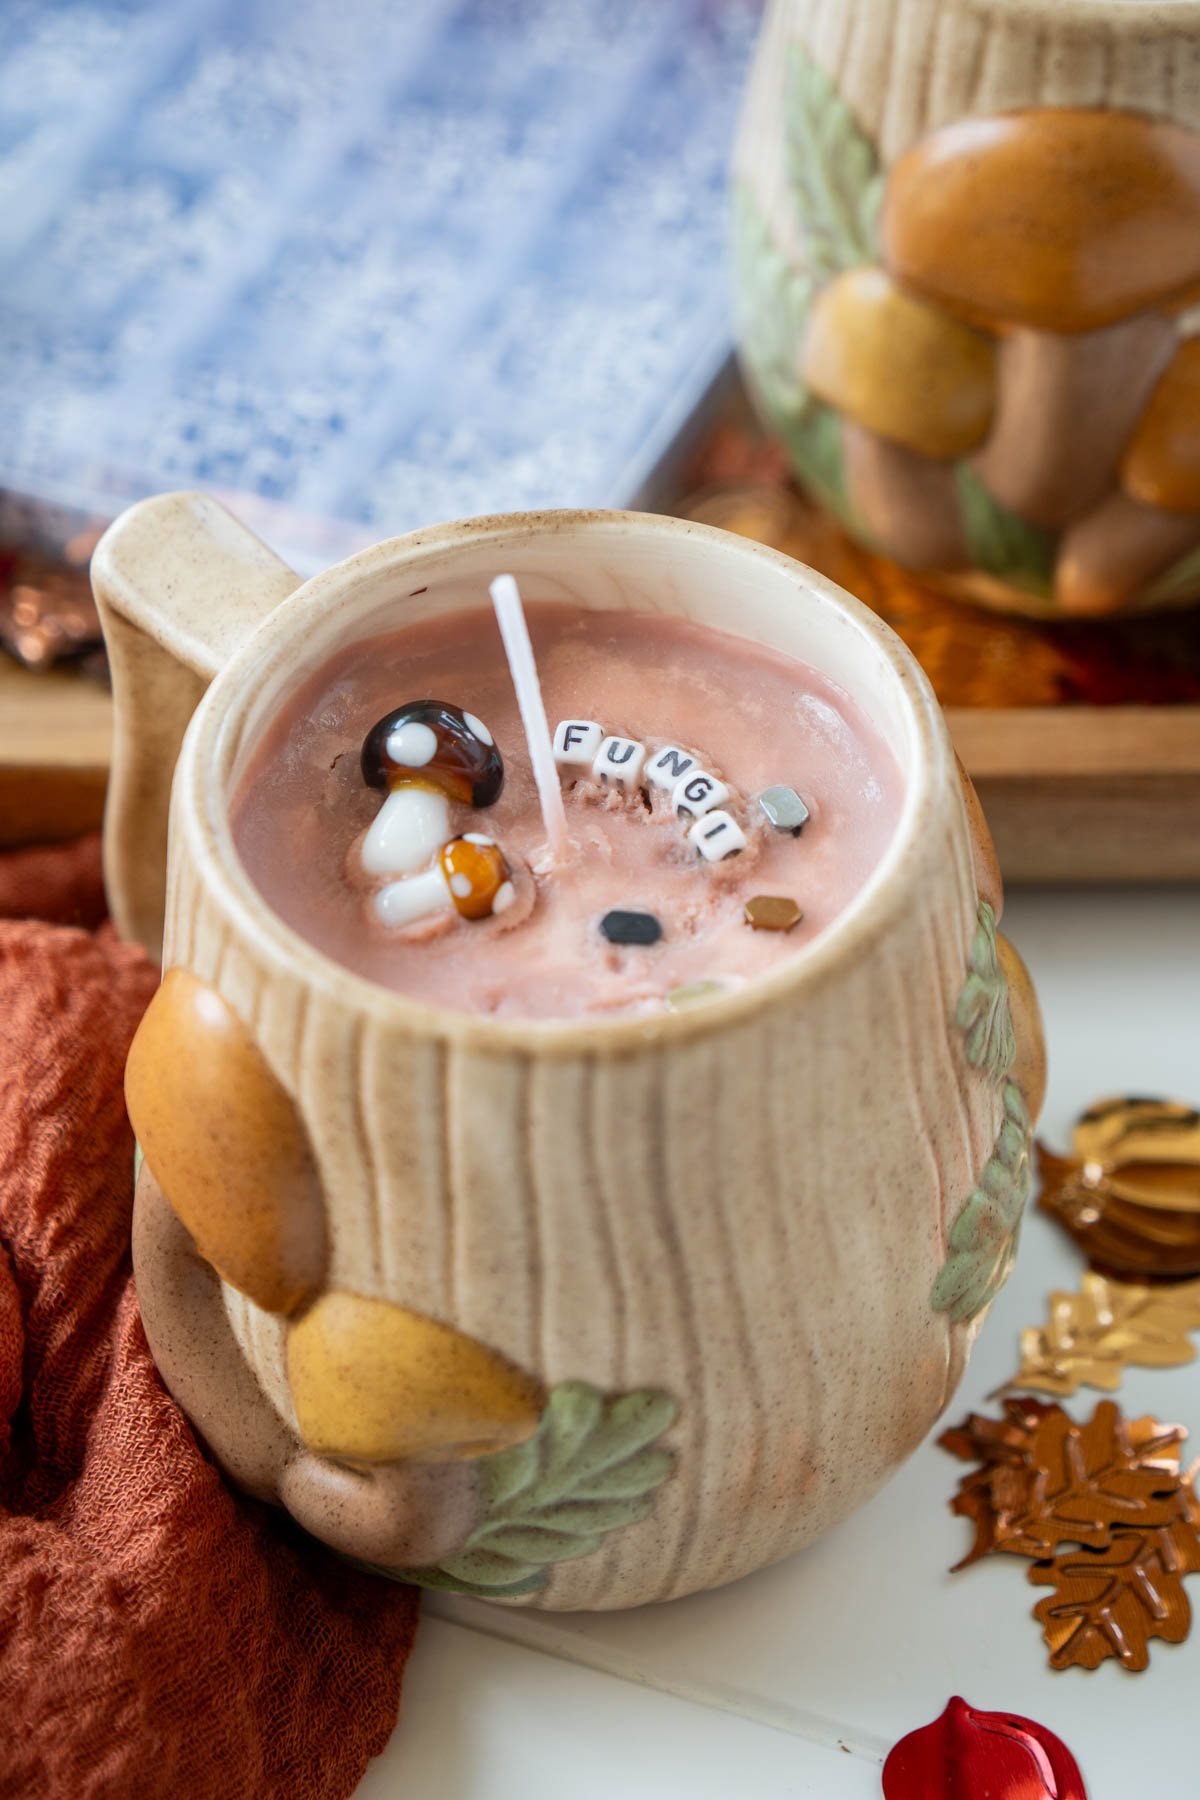
- Mugs – I used cute fall mugs from the thrift store, but any mug will work. You can also do this with decorative containers, just make sure whatever you use is heat proof. You can see some of our thrift stores mug below! You could even have everyone bring their own if you want!
- Beads – this part was really fun to shop for. I walked around Hobby Lobby and picked up a bunch of cute fall beads, square letters, charms, and other small trinkets that were 50% off to use in the candles. These candles are pretty small, so the beads go a long way; no need to go overboard unless you want to.
- Thin-nosed tongs – I found it helpful to have something to help place the small items. If you don’t have thin-nosed tongs, you can use chopsticks (kid ones would work great), kitchen tweezers, or toothpicks as an alternative.

How to make A Mug Candle
I am by no means an expert in the art of candle making. Lucky for me, there are easy-to-use kits that made it super simple to make these cute decorative candles despite my beginner status. So this tutorial is going to be more about how to make the mug candle than how to make a candle in general.
1 – Melt and Color the Wax
The first thing you need to do is make the base candle so that it’s ready to decorate and finish. Here’s the process we used!
Note!
For our girls night, we asked everyone which mug they wanted, what color they wanted, and what scent they wanted. We prepped the candles ahead of time since we didn’t have that much time for our girls night and wanted everyone to go home with a finished candle. If you have enough time, you can definitely do the entire process below during your craft night!
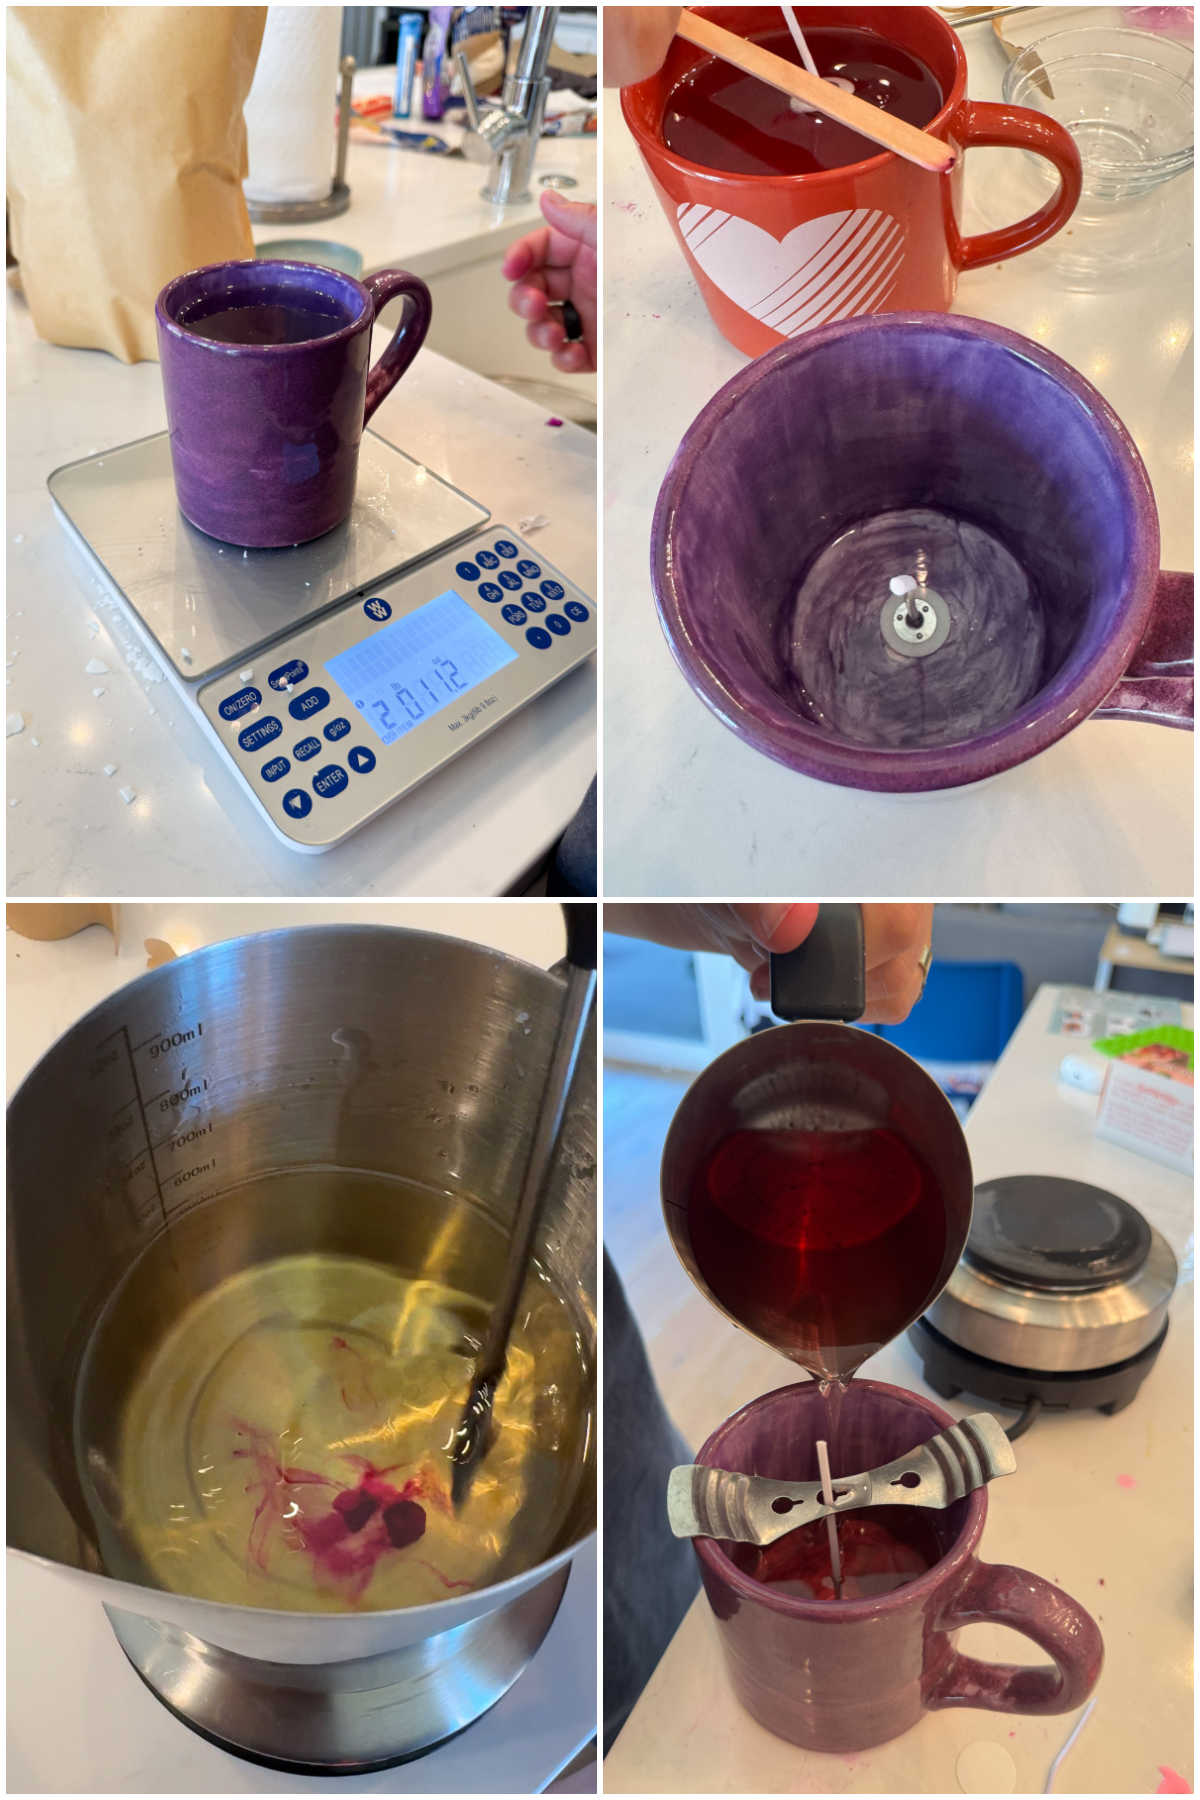
- Figure out how much wax the mug can hold by weighing the amount of water it can hold on a kitchen scale. For each ounce of water, you’ll need that many ounces of wax flakes. So a mug that holds six ounces of water needs six ounces of wax flakes.
- Use the wax melter to melt the wax until it is completely liquid. (If you’re using a candle making kit, I recommend following whatever instructions it comes with.)
- Add the scent and coloring you’d like to the melted wax, stirring it in with a popsicle stick. And don’t be like me and try food coloring – it definitely doesn’t work! Again, follow any instructions that come with the coloring or candle making kit if you have them!
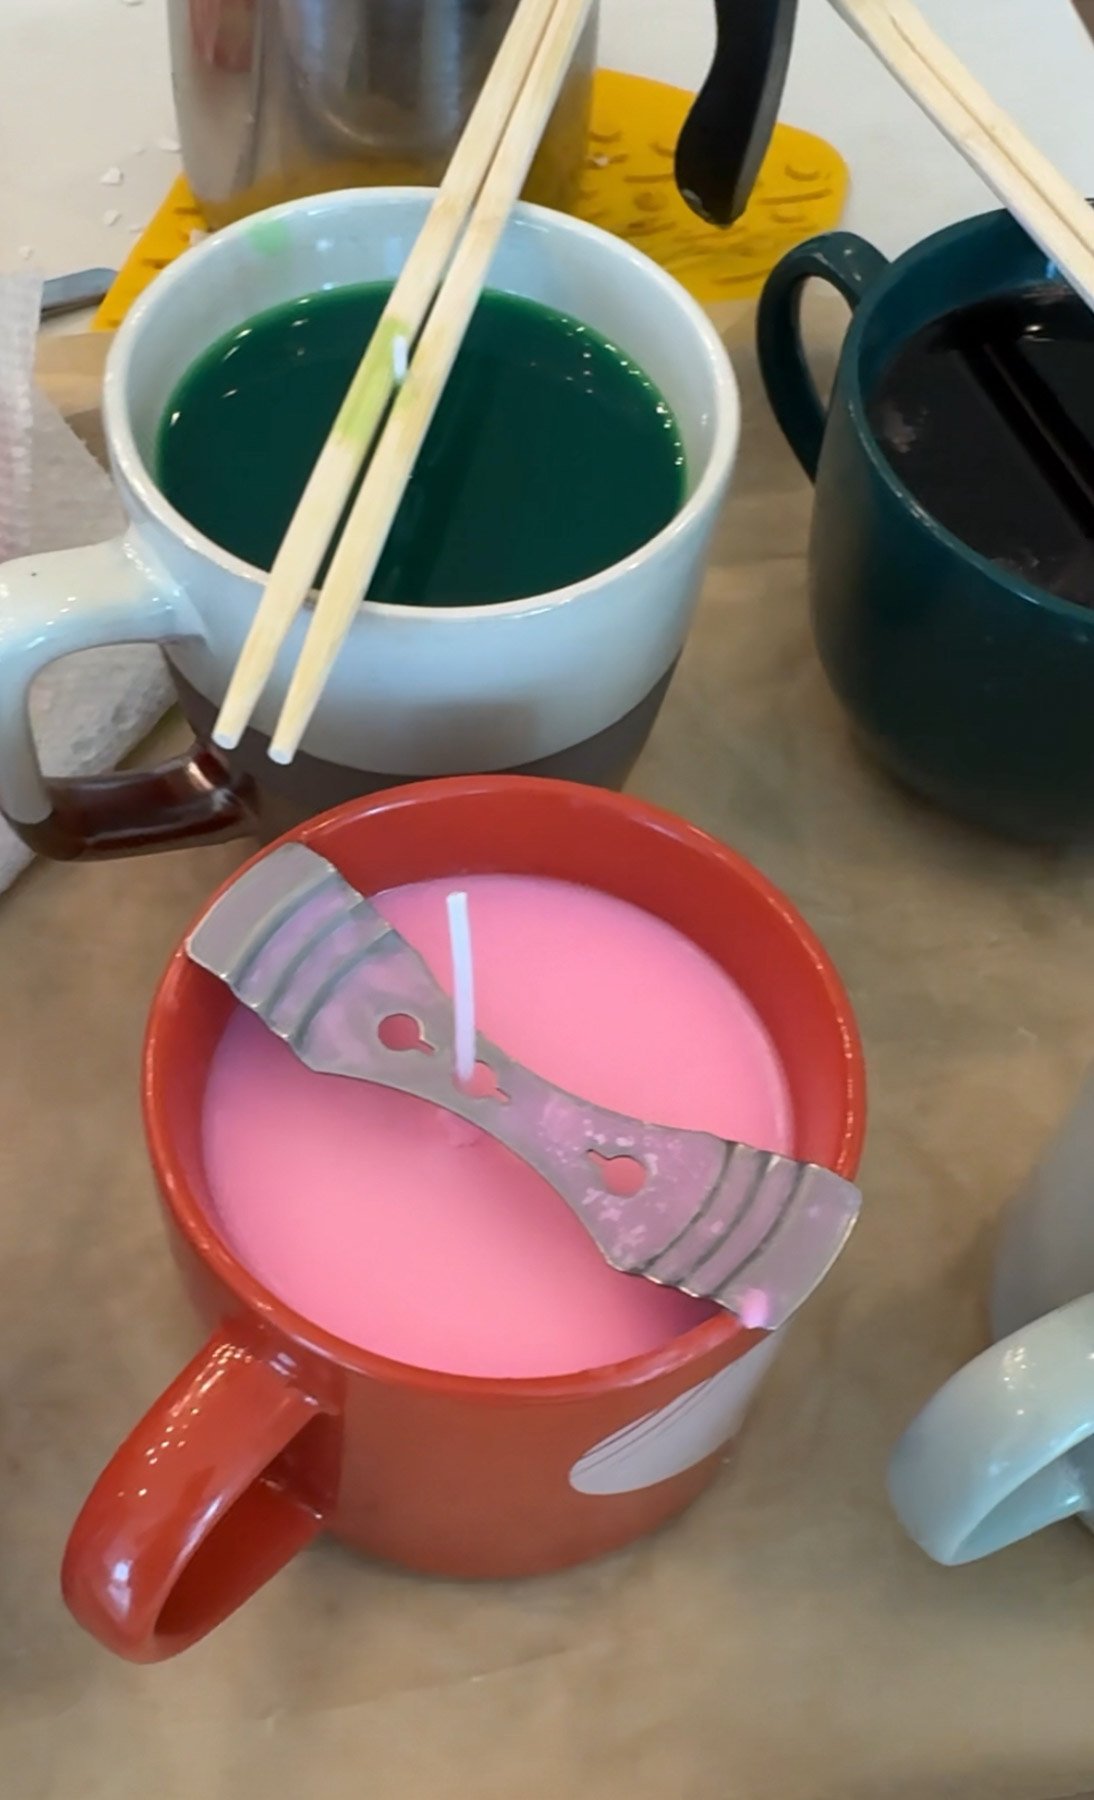
- Add the wick to the center of the mug, pushing it down firmly so it sticks to the bottom of the mug. Then carefully place either a wick holder (often come with packs of wicks) or chopsticks or even popsicles sticks around the wick to keep it centered as you pour in the wax.
- Pour almost all of the melted wax into your mug, leaving a few tablespoons out. Pour those remaining tablespoons into a small microwave safe bowl and save for later.
Melting tip!
Because we all wanted different colored candles and different scents, I had to melt the wax individually. If you are making one candle or are only doing one color for the group, then you can melt all your wax at one time. This would save you a lot of time and could easily be done in a large saucepan.
2 – Let Wax Harden
Now you need to wait for the wax to harden. The amount of time it takes will largely depend on how big the candle is and how hot your house is but I’d say it took 1-2 hours for our wax to solidify enough to do the craft.
This is a great time to hang out, eat some fall snack mix, talk, make sweater pumpkins, or watch a movie.
You can also speed up the cooling process by putting them in the fridge or freezer, but it will likely cause your candles to crack, so I don’t recommend it if you want candles with a nice smooth top.
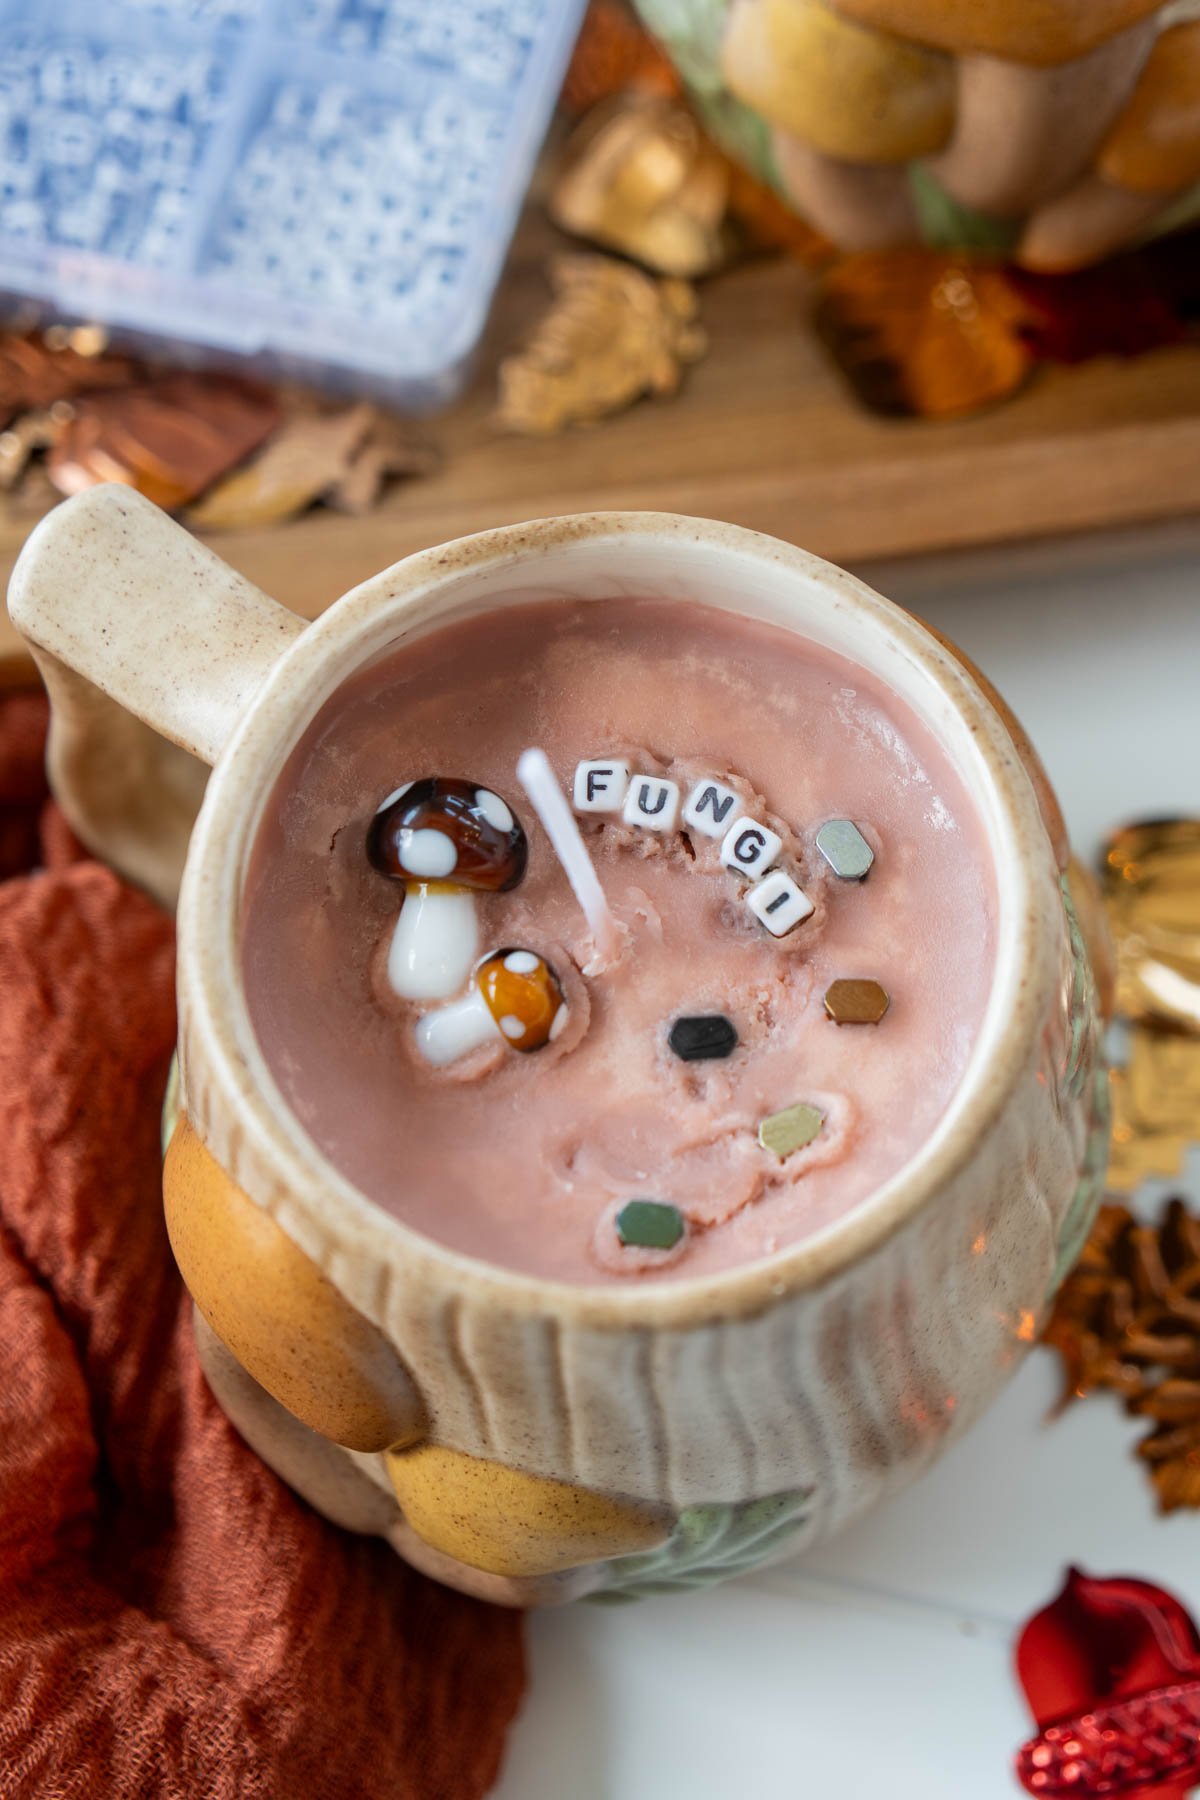
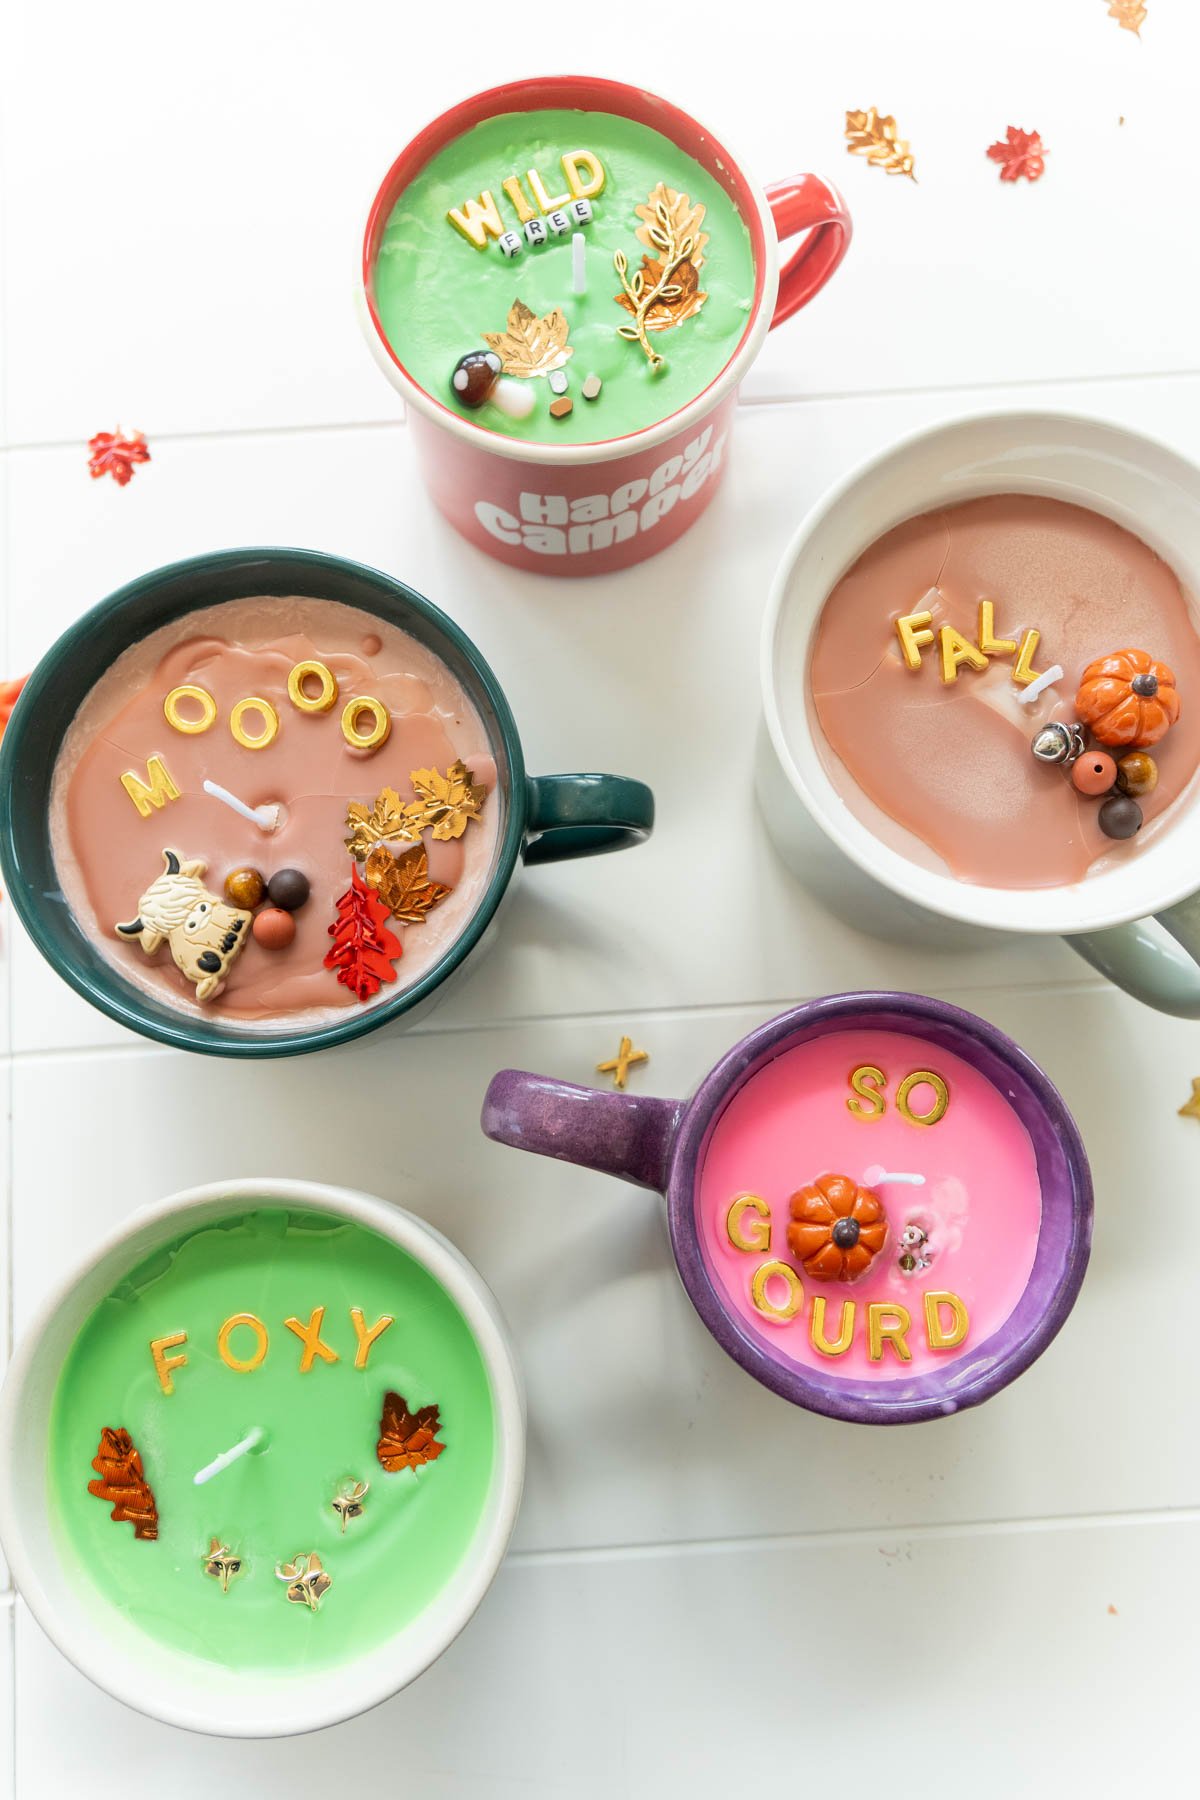
3 – Create Your Mug Candle Design
The wait is finally over; it’s time for the fun part, designing the candles!
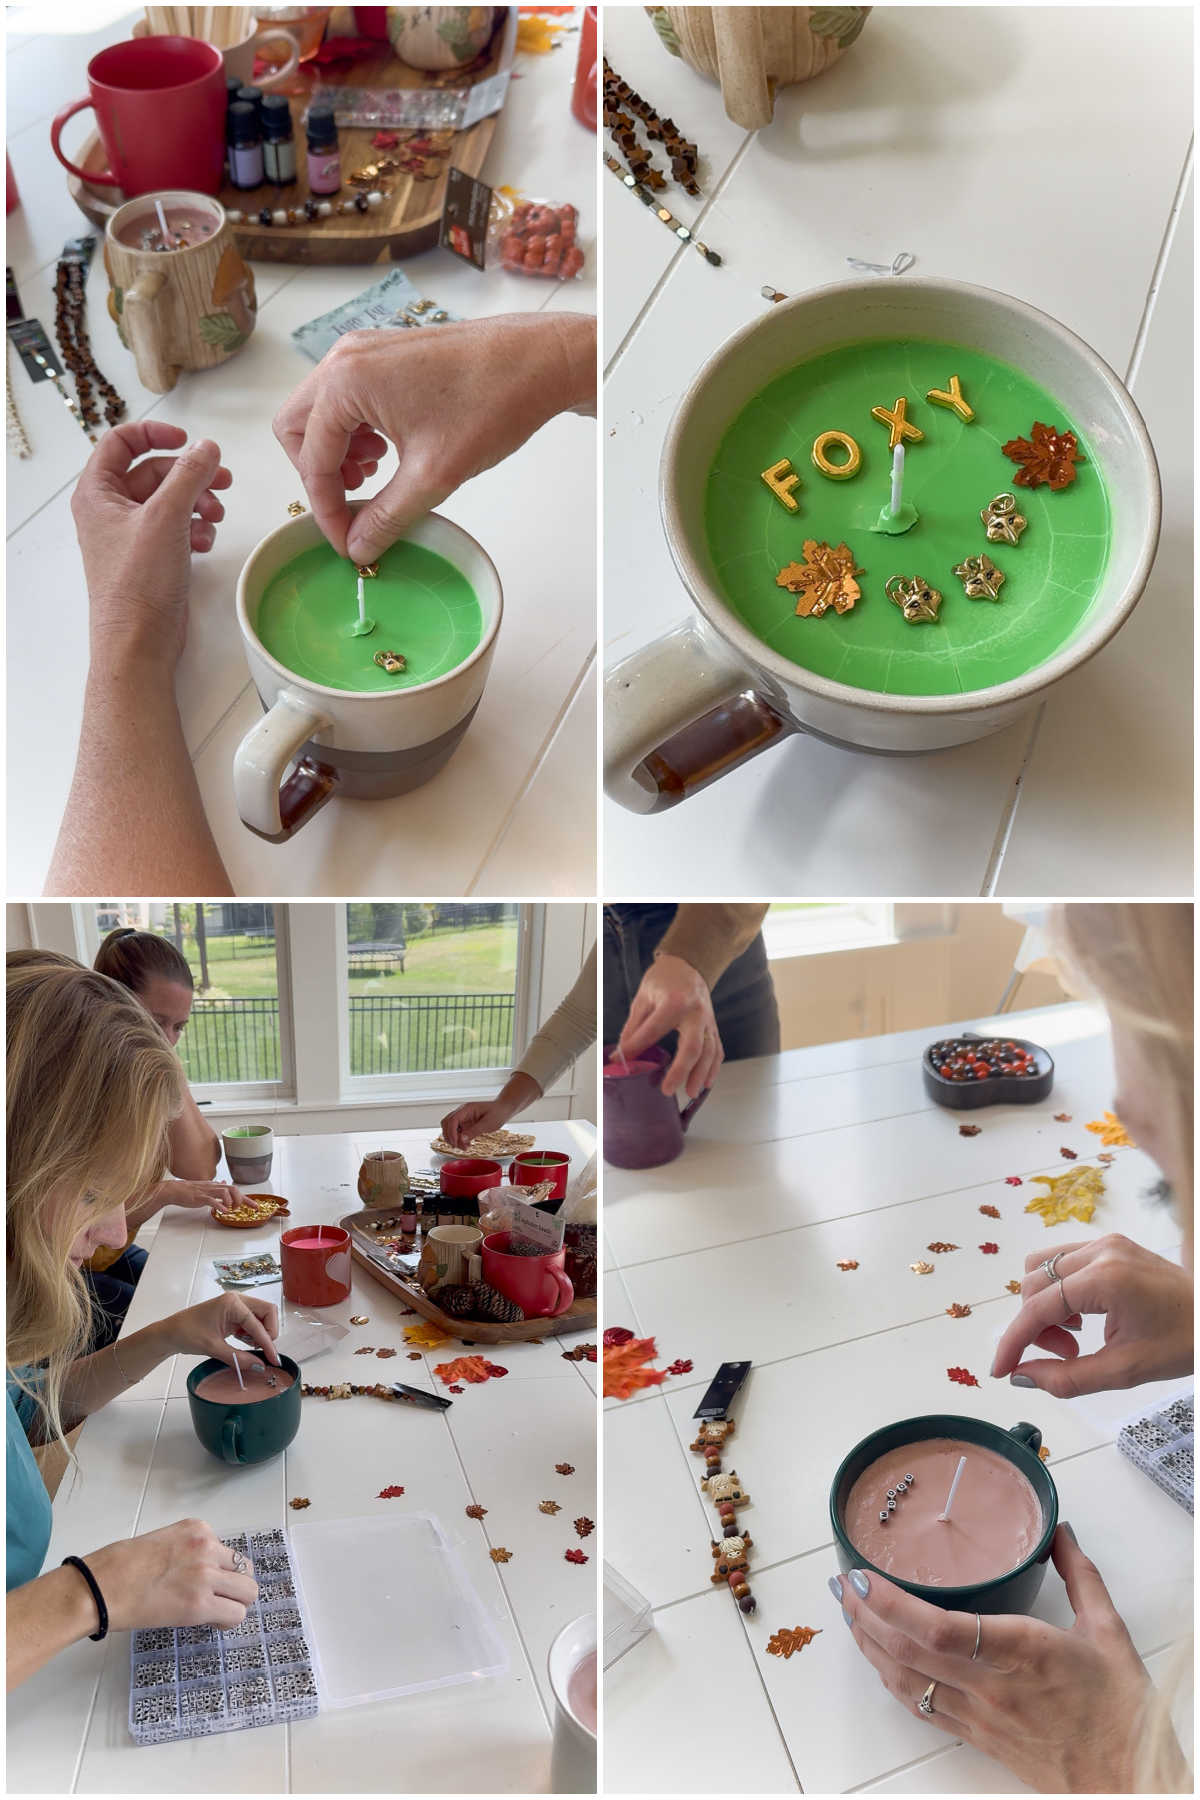
- Choose whatever beads and letters you want to design your candle.
- Lay the design out on the hardened candle top to see what it’ll look like and figure out your spacing. It can have a cute fall saying, beaded pattern, or whatever makes you happy!
- Remove the design from the candle and set aside for a minute.
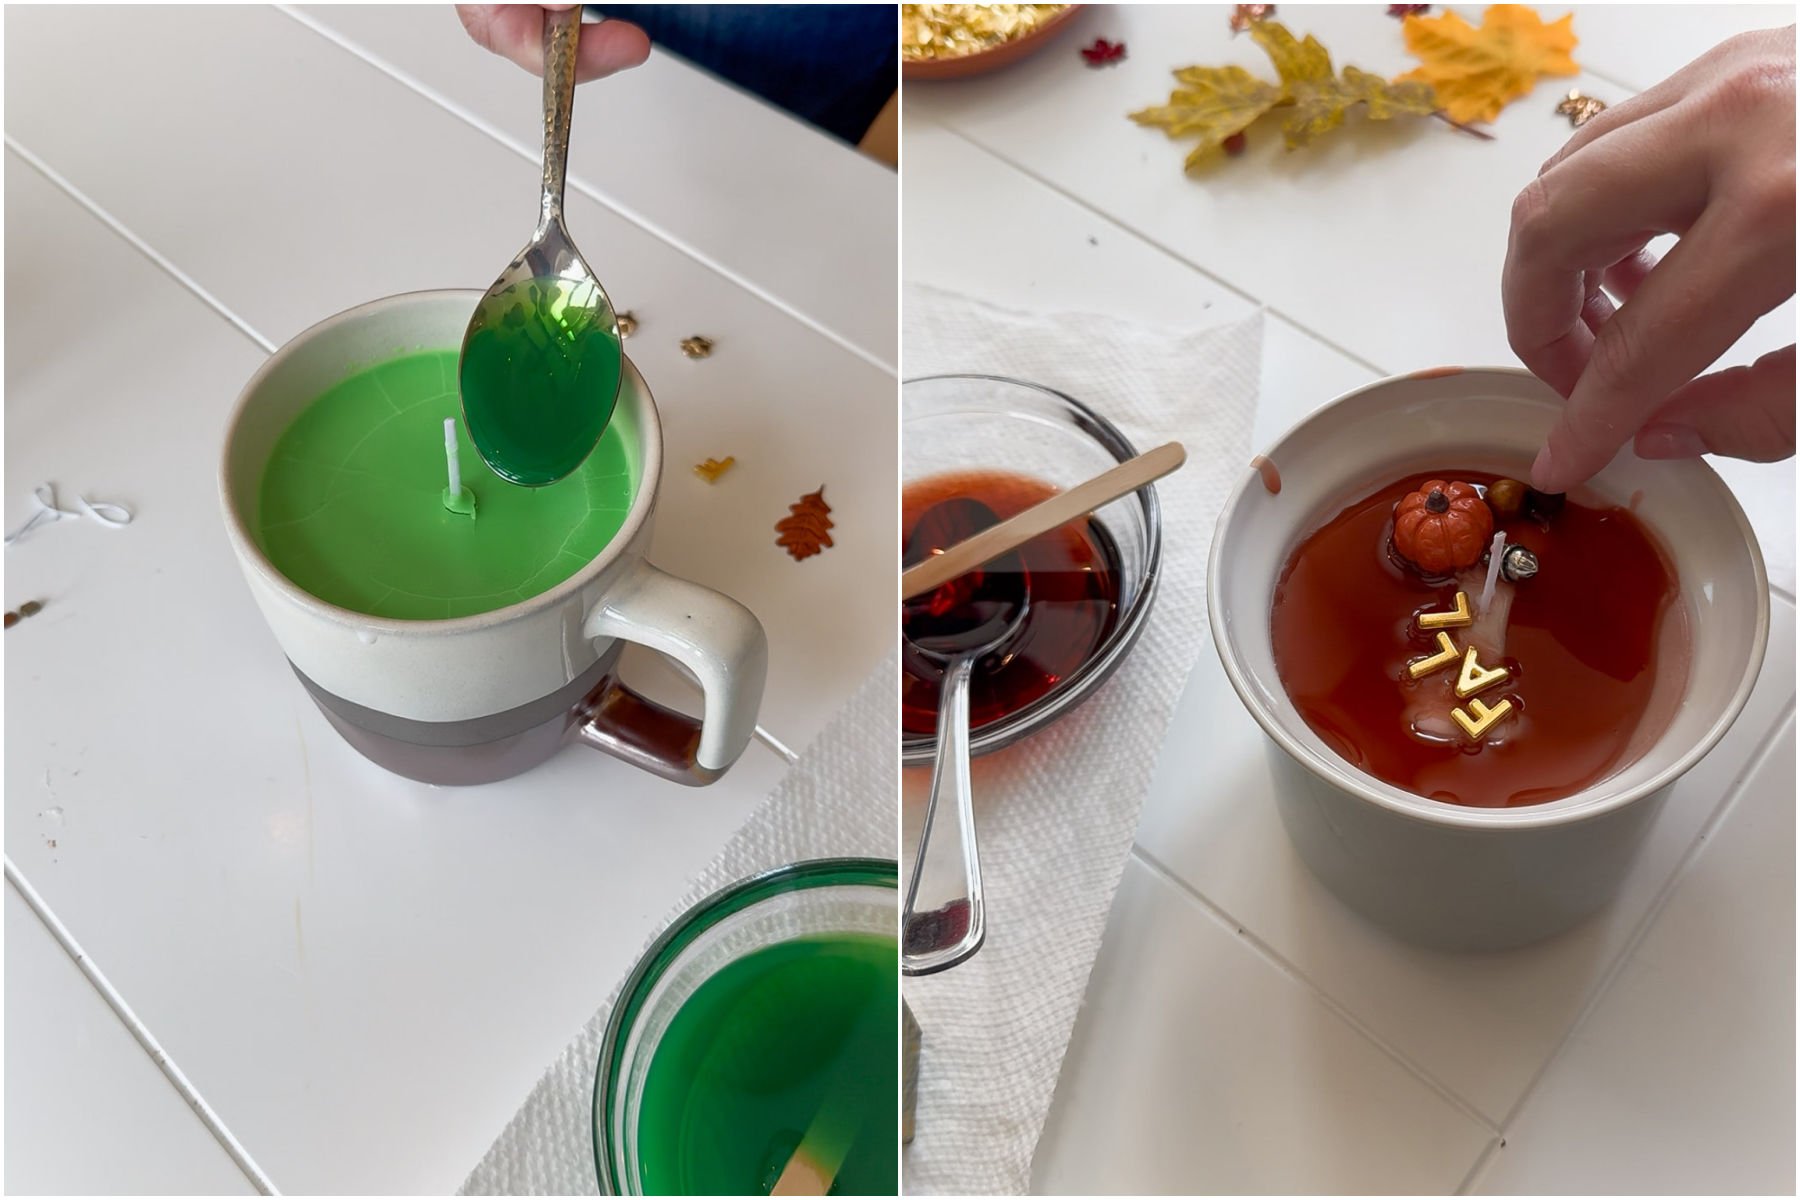
4 – Finish the candles
- Melt the extra tablespoons of wax that you saved (that match you color and scent) in the microwave – heat for 30 second increments until liquified.
- Spoon the liquified wax on top of your candle top, just adding enough to do a thin layer of wax – you may not use it all and that’s okay.
- Immediately place the design on top of the melted candle wax, using tweezers for perfect placement (and to avoid burning your fingers on the hot wax). Try to be precise – the more you move them around, the more ridges you’ll end up with around your designs.
- Let it dry and harden, giving you the cutest little mug candles!
Tip!
If you forget to save some extra wax, you can also just use a lighter to remelt the top layer of the wax, then place the design on top. We tried this on a few of our candles and while it doesn’t give you the same clean layer as the above method does, it works in a pinch.
Once your design is in, leave it on a flat surface to dry. This should only take a couple of minutes.
After the wax is set, you’ve got a festive mug candle ready to be enjoyed. Here are a few of the designs my friends came up with during our candle mug craft night! I love how creative they were with this!
Craft FAQs
Do I have to buy a candle making kit?
No, I used a kit because it had everything I needed. If you have supplies already, you can just use those. If you don’t have the supplies, the candle making kit was definitely the most affordable way to go.
How much wax do I need?
That is hard to answer since it depends on what mug you are making and how many. The average mug holds 8 – 12 ounces, so roughly 3/4 a pound per mug.
Can I actually use these candles?
Absolutely – just know that once you start using the candles, your design will never look the same. I’m personally using my candle more as a decor item in my office, but you can use it however you want!
Helpful Tips
If you have a limited amount of time for this craft and want to do it together at a party, prep the candles ahead of time by filling them and letting them harden at room temperature. Then just finish the craft for your girls night!
Try not to move the design around after you place it. The more you tinker and try to get things just right, the more ridges your wax will have once it dries.
These are intended to be decor, so if you choose to melt them, the design will melt with it.
Mug Candle Craft
Ingredients
- mug
- candle wax amount varies based on mug
- candle scents
- candle coloring
- candle wick
- fall beads + letters
Instructions
- Figure out how much wax the mug can hold by weighing the amount of water it can hold on a kitchen scale. For each ounce of water, you’ll need that many ounces of wax flakes. So a mug that holds six ounces of water needs six ounces of wax flakes.mug
- Use the wax melter to melt the wax until it is completely liquid. (If you’re using a candle making kit, I recommend following whatever instructions it comes with.)candle wax
- Let the wax cool down until its temperature reaches 185°F. Add the scent and coloring you’d like to the melted wax, stirring it in with a popsicle stick. Again, follow any instructions that come with the coloring or candle making kit if you have them!candle scents, candle coloring
- Add the wick to the center of the mug, pushing it down firmly so it sticks to the bottom of the mug. Then carefully place either a wick holder (often come with packs of wicks) or chopsticks or even popsicles sticks around the wick to keep it centered as you pour in the wax.candle wick
- Pour almost all of the melted wax into your mug, leaving a few tablespoons out. Pour those remaining tablespoons into a small microwave safe bowl and save for later.
- Allow the candle to harden completely, this can take 1-2 hours depending on how large your mugs are.
- Once hardened, use beads to create a design on the candle. Lay the design out on the hardened candle top to see what it’ll look like and figure out your spacing. Once you’ve finalized the design, remove it and set aside.fall beads + letters
- Melt the extra tablespoons of wax that you saved (that match you color and scent) in the microwave – heat for 30 second increments until liquified.
- Spoon the liquified wax on top of your candle top, just adding enough to do a thin layer of wax – you may not use it all and that’s okay.
- Immediately place the design on top of the melted candle wax, using tweezers for perfect placement (and to avoid burning your fingers on the hot wax). Try to be precise – the more you move them around, the more ridges you’ll end up with around your designs.
- Once your design is in, leave it on a flat surface to dry. This should only take a couple of minutes. Once it’s hardened, it’s ready to enjoy.
Tips & Notes:

More Fall Crafts
If you need even more fall crafts for your craft night, try one of these fun fall activities!
- Fall art projects – tons of fall projects that use your artistic side!
- Turkey crafts – tons of cute turkey crafts perfect for Thanksgiving!
- Apple craft – this one’s great for kids, made with just popsicle sticks and paper!
- Ghost luminaries – these cute DIY luminaries just use cups and paper!
- Pumpkin patch craft – super cute craft using apples and pumpkins!

Want more Party Ideas?
Want more easy party ideas like this one? Enter your first name and email address in the form below to join the Play Party Plan community! You’ll receive weekly party ideas, games, and recipes directly to your inbox!


Leave a Reply