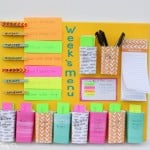
DIY Menu Board
This easy DIY menu board uses things you can grab at a craft store or in your own pantry to keep recipe ideas and your weekly menu all in one place. It’s simple to make, colorful, and effective for weekly menu planning!
Servings: 1 menu board
Cost: 10
Equipment
- hot glue gun
- gluesticks
- Scissors
- Sharpie markers
Ingredients
- 1 2x3 canvas
- 10 juice boxes emptied, rinsed, and dried
- scrapbook paper cut into 4" strips
- 7 clothespins
- washi tape
- colored index cards
- double-sided tape
- grocery list or small notepad
- Vinyl, stickers, or paint and stencils
Instructions
- If you're going to paint your canvas, do that first and let it dry while you work on the other items.
- Add a strip of washi tape to each of the clothespins then write the days of the week on top.
- Cut strips of scrapbook paper and tape them around the juice boxes.
- Write recipe categories to the outside of the juice boxes - things like chicken, beef, soup, and pasta.
- Figure out what you want each color of your index cards to indicate. You can do types of recipes (e.g., kid-friendly, adult, healthy), time (e.g., under 30 minutes, slow cooker), or anything else. Use this indicator to create a key showing the color-coding.
- Cut your index cards into thirds so they are about 1" wide.
- Add recipe names to the front of index card pieces. Flip over and add the source (e.g., website, cookbook) and any key ingredients you'll need for the recipe.
- Glue everything in place on the board including the juice boxes, clothespins, extra boxes, and grocery shopping list.
- Hang the menu board where you'll regularly see and use it.
Video
Notes
Don’t double up your categories and your color-coding, meaning don’t put something like slow cooker recipes in both places.
Don’t wait to make the board until all your recipe cards are written. The idea is that you can constantly be adding more meal ideas to the board so just get the board done and add recipe cards as you go.
Make it a family project. Let kids help choose colors, meals to go on the cards, and even help put things together. They’ll be more likely to want to help with meals and even eat meals if they’re involved in the planning.