DIY Game Spinner
Easy DIY game spinner using just things you have around the house!
Servings: 1 spinner
Cost: $1
Equipment
- 1 Pair of scissors
- 1 drill with drill bits
- Tape
- Black marker
- various colored markers
- 1 Pencil
- 1 ruler
Ingredients
- 1 plastic bone
- 1 large piece cardboard
- 2 plastic straws
Instructions
Prep The Cardboard
- Start by cutting your cardboard to the desired size. A box cutter, scissors, or Exacto knife will all work for this. Remember to be careful while doing this portion.1 large piece cardboard
- Once cut you will want to mark the center of the cardboard using a marker.
- Using your compass place one pencil in the center of the cardboard. Then without moving the pencil in the middle begin drawing a circle with the other attached pencil by keeping the string taut while you circle the cardboard. This is easier if you have a large circular item like a clock you can trace. Or you can freehand it if you trust yourself!
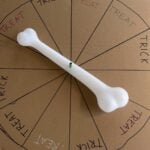
- Then use a straight edge, like a ruler or a leftover piece of cardboard, and divide the circle into twelve sections. It'll look like a pie chart.
- With the game board set up, it is time to prep the spinner. Begin by inserting one of the two straws into the other. I had to squish mine to make it fit, it doesn't have to be pretty, it's just for support.2 plastic straws
- Next mark the center of your bone using a pencil or marker.
- Using your drill with a drill bit that is slightly larger than your straw, drill a hole through the mark on your bone. You'll want to keep this as straight as possible when you go through the bone so it spins easily.1 plastic bone
- Test your straw to make sure it fits easily into the hole you've drilled. Make adjustments as needed using larger drill bits.
- Make a hole the size of your straw in the marked center of the cardboard.
- Cut three slits into the end of the doubled-up straw about an inch long. Then fold those sections so they sit flat on a surface like a tripod.
- Insert the straw into precut hole in the cardboard with the cut slits on the bottom of your game board.
- Tape the cut slits to the back of the cardboard to secure your straw in place.
- Put the bone onto the secured straw then cut the straw to an appropriate length so you don't have an extra long straw sticking out of your game board.
- Test out your spinner and make any minor adjustments you need.
- Using a different colored marker for each section, write the word treat in eight of the twelve sections.
- Then using a black marker write the word trick in the remaining four. These can be in any order you want. There is no wrong way to do this.
- Once your game board is filled in how you want it, your spinner is ready to go!
Notes
Supply Notes:
- Cardboard – I used an old box I had lying around the house. You will want it to be big enough to fit the bone and writing. You can also use a foam board.
- Plastic bone – I got mine from the Dollar Tree. If you can’t find one there, you can try using a paper towel roll with a bone drawn on it or a piece of PVC pipe. Or really anything else long and skinny that will spin.
- Markers – it worked best to have a variety of colors for the game we played with it. If you’re just going to do trick or treat (and not use the colors), you can just do black permanent marker.
- Plastic straw – you will want two of these.
- Drill – while I would highly recommend using a drill with a drill bit for this, you could try using an Exacto Knife. Please remember to use caution when using this and keep it out of the hands of any kids. If you are using a paper towel roll a knife will be just fine.
- Tape – I used painter’s tape because that’s what I found first, but any type will do as long as it’s sturdy!
- Compass – I used a makeshift compass by tying two pencils together with a string. You can also simply trace a circle if you have something on hand large enough. I have used a clock before that worked great as well or a pizza pan works too!