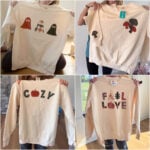
DIY Fall Cozy Sweatshirt
Make your own cozy sweatshirt at home with a fun fall craft night, girls night, or even just on your own.
Servings: 1 sweatshirt
Equipment
- sewing scissors
- iron
- Needle
- pencil or fabric marker
Ingredients
- iron on bonding sheets
- sweatshirt
- fabric
- embroidery floss
- stencils
Instructions
- Choose your fabrics and matching embroidery threads. Lay out the desired design on the sweatshirt using the stencils.sweatshirt, fabric, stencils
- Trace the stencils onto the fabrics using a pencil or sewing markers.
- Use the fabric scissors to cut out the shapes you just traced on the fabric.
- Roll out the bonding sheet onto an iron-safe surface. Make sure to read the package instructions so that you know how to use the bonding sheet correctly.iron on bonding sheets
- Arrange your cut-out pieces with the fabric side face up so that they are not touching on the bonding sheet. You don’t need a lot of space, but they can’t be touching.
- Gently iron the pieces until they are completely bonded. The package instructions will provide you with exact times and temperatures to use.
- Once all the pieces are done, cut each one out individually, making sure not to cut the fabric (it’s okay to leave a little bit of bond around the shape).
- You’ll likely remove the bond backing now but read your instructions carefully to make sure this process is done correctly – then place them where you want on the sweatshirt (with the fabric side up), and iron them into place.
- Using the embroidery thread and needle, hand stitch any additional designs you’d like or just stitch all the way around the edge of the designs.embroidery floss
- Use the embroidery needle and thread to outline the design as desired to finish the sweatshirt.
Notes
Use a printer to print out the designs you want. That way, you don't have to spend forever or be an artist to get your designs to be perfect.
Read the package instructions for your bonding sheets. I can't guarantee that you use the same one I did, so make sure you know how to use it properly.
If you like to sew, do it! There is no reason you can't use a sewing machine or hand-stitch the patches on.