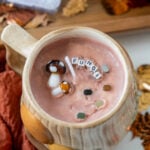
Mug Candle Craft
Make a custom mug candle in minutes with fun letters, beads, and cute designs! Perfect for girls night, craft night, and more!
Servings: 1
Equipment
- kitchen scale
- max welter
- metal thermometer
- chopsticks or popsicle sticks
- metal tongs
- microwave safe bowl
Ingredients
- mug
- candle wax amount varies based on mug
- candle scents
- candle coloring
- candle wick
- fall beads + letters
Instructions
- Figure out how much wax the mug can hold by weighing the amount of water it can hold on a kitchen scale. For each ounce of water, you’ll need that many ounces of wax flakes. So a mug that holds six ounces of water needs six ounces of wax flakes.mug
- Use the wax melter to melt the wax until it is completely liquid. (If you’re using a candle making kit, I recommend following whatever instructions it comes with.)candle wax
- Let the wax cool down until its temperature reaches 185°F. Add the scent and coloring you’d like to the melted wax, stirring it in with a popsicle stick. Again, follow any instructions that come with the coloring or candle making kit if you have them!candle scents, candle coloring
- Add the wick to the center of the mug, pushing it down firmly so it sticks to the bottom of the mug. Then carefully place either a wick holder (often come with packs of wicks) or chopsticks or even popsicles sticks around the wick to keep it centered as you pour in the wax.candle wick
- Pour almost all of the melted wax into your mug, leaving a few tablespoons out. Pour those remaining tablespoons into a small microwave safe bowl and save for later.
- Allow the candle to harden completely, this can take 1-2 hours depending on how large your mugs are.
- Once hardened, use beads to create a design on the candle. Lay the design out on the hardened candle top to see what it’ll look like and figure out your spacing. Once you've finalized the design, remove it and set aside.fall beads + letters
- Melt the extra tablespoons of wax that you saved (that match you color and scent) in the microwave – heat for 30 second increments until liquified.
- Spoon the liquified wax on top of your candle top, just adding enough to do a thin layer of wax – you may not use it all and that’s okay.
- Immediately place the design on top of the melted candle wax, using tweezers for perfect placement (and to avoid burning your fingers on the hot wax). Try to be precise – the more you move them around, the more ridges you’ll end up with around your designs.
- Once your design is in, leave it on a flat surface to dry. This should only take a couple of minutes. Once it's hardened, it's ready to enjoy.
Notes
If you have a limited amount of time for this craft and want to do it together at a party, prep the candles ahead of time by filling them and letting them harden at room temperature. Then just finish the craft for your girls night!
Try not to move the design around after you place it. The more you tinker and try to get things just right, the more ridges your wax will have once it dries.
These are intended to be decor, so if you choose to melt them, the design will melt with it.
If you forget to save some extra wax, you can also just use a lighter to remelt the top layer of the wax, then place the design on top. We tried this on a few of our candles and while it doesn’t give you the same clean layer as the above method does, it works in a pinch.
Because we all wanted different colored candles and different scents, I had to melt the wax individually. If you are making one candle or are only doing one color for the group, then you can melt all your wax at one time. This would save you a lot of time and could easily be done in a large saucepan.
