
This easy DIY menu board uses things you can grab at a craft store or in your own pantry to keep recipe ideas and your weekly menu all in one place. It’s simple to make, colorful, and effective for weekly menu planning!

Want to save this Idea?
Enter your email below and we’ll send this idea straight to your inbox (plus you’ll receive tons of fun weekly ideas from us!)
I talked about it a little bit in my teriyaki chicken stir fry post, but I’m sick of cooking. But one of the things that has made cooking a bit easier is menu planning.
If I don’t have to think about what I’m making for dinner, it’s a bit easier. When everything got crazy last March, my husband and I started using this weekly meal planner. It worked well but one thing that I didn’t love was that it didn’t give me any way to keep track of meal ideas.
So every single week we were starting from scratch trying to come up with what we wanted to eat. And it got really old, really fast.
This DIY menu board solved that problem for us and has been a life saver for menu planning, and it’s super easy to make one for your home!
Why You’ll Love It
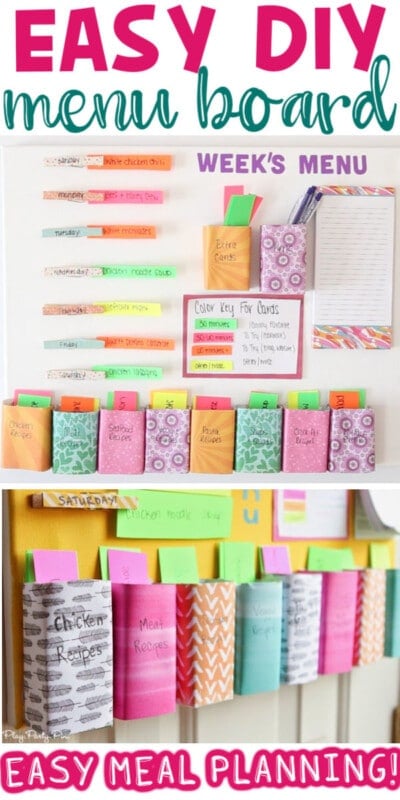
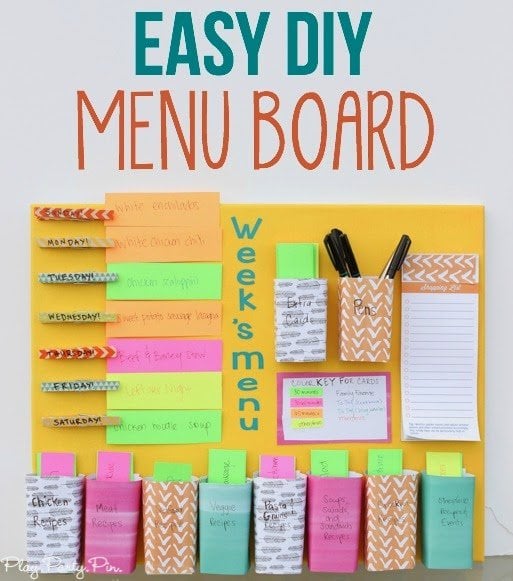
- Everything in one place – I have it setup so that you can have your meal plan, your recipe ideas, pens, a shopping list, and more all in one menu board.
- Customize the colors – you can use different papers, tape, and colors to make it match the decor of your house. Or just simply do black and white if you want something that’s more farmhouse chic.
- Easy to make – once you have all of your supplies together, this literally only takes a few minutes to make. Plus, it’s cheap since it uses things like empty juice boxes and paper.
Supplies

- 2×3 Canvas – this size seemed to work best for the items I put on the menu board. You could go bigger or smaller and have more categories or add additional things onto the board.
- Juice boxes – make sure they are empty, rinsed, and dried out before you use them.
- Scrapbook paper – choose colors and patterns that match your space. I also recommend doing paper that is bendable rather than something stiff like card stock.
- Clothespins – you’ll need seven high-quality clothespins to hold your meal ideas
- Scissors – to cut all the things!
- Washi tape – patterns and colors to match your space
- Colored index cards – I did different colors to match the time lengths for my recipes but you could use these for something else or just use white if times don’t matter to you.
- Grocery list or small notepad – I like to keep my Erin Condren grocery list on mine, but you could also use just a regular notepad of any sort.
- Colored vinyl – you can either do vinyl or stickers or paint using a stencil or skip this altogether if you don’t care for it to say menu
- Sharpie markers – I used black Sharpies to write category names on my juice box holders but you could also use labels or regular pens, totally up to you. Just make sure you can read them.
- Hot glue gun and gluesticks – you’ll want this to attach everything to your canvas.
- Permanent double-sided tape – this is what I used to attach the papers to the juice boxes, but you could really use any kind of tape.
How to Make a DIY Menu Board
This menu board is much easier to put together than it may seem at first glance! I’ve included step by step instructions as well as a video you can watch to see how easy it is!
The first thing you need to do is get everything together. Once you get started, you’re not going to want to stop – so make sure you have all supplies for the project first!
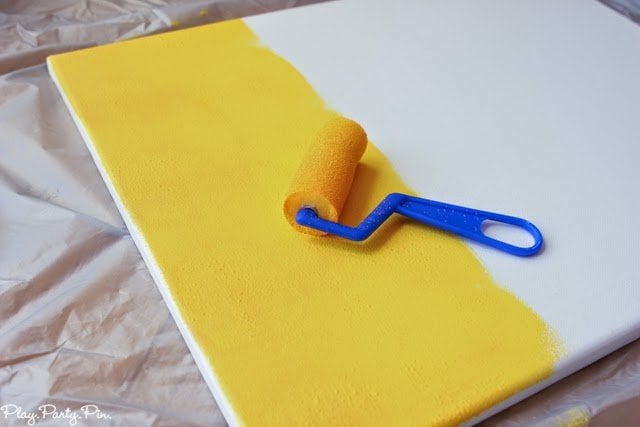
Before you actually get started, paint your canvas if you want and let it dry completely. While it’s drying, you can get started on everything else.I have examples in this post of both a white version and a yellow one if you’re looking for more color!
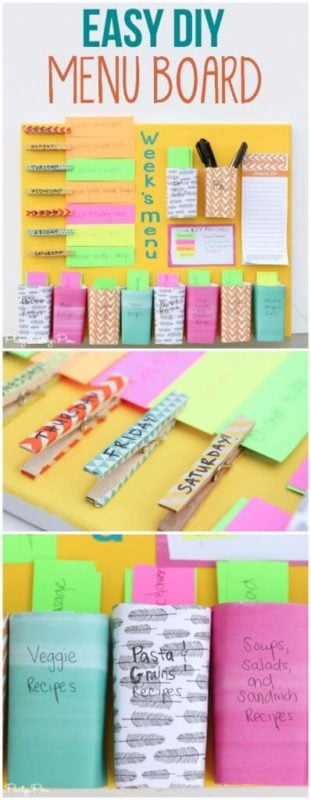
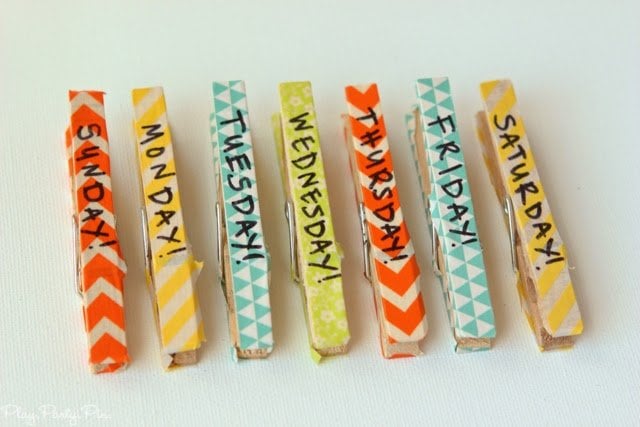
Let’s start with the clothespins because those are the easiest. Simply cover the top of each of your clothespins with a little colorful washi tape (or don’t if you’d rather go with the natural look).
You’ll want to cover seven clothespins, one for each day. Once the tape is stuck on, write the day of the week on each of the clothespins – making sure to start the word on the side that won’t be holding the paper.
Next you’re going to cut your scrapbook paper into strips and use the scrapbook paper and tape to cover the outside of your juice boxes. I used ten total juice boxes (including two for my extra cards and pens), but you could have more or less than this depending on how many categories you want.
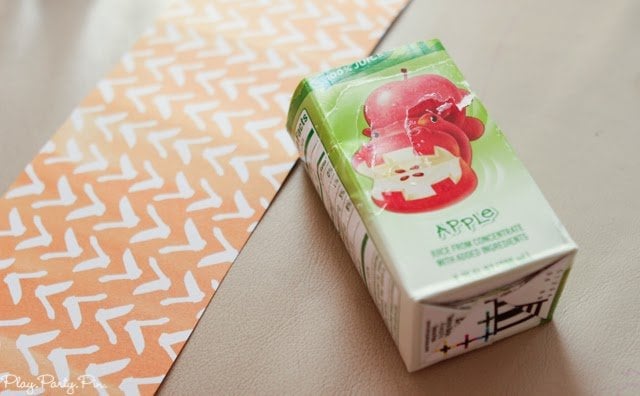
I used leftover paper from my DIY advent calendar, but you can use whatever you have on hand.
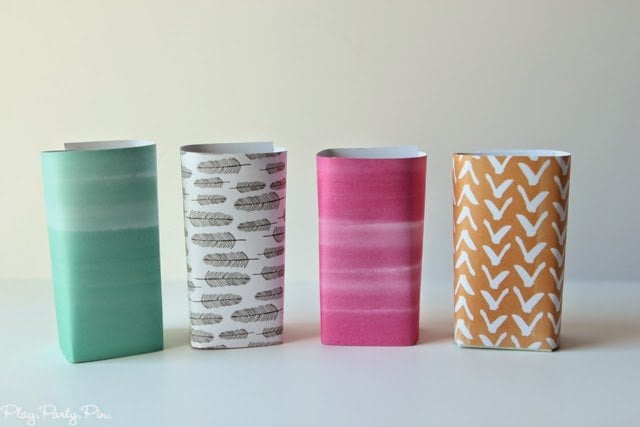
Once each of the boxes is covered, use a marker to write the category of recipes on each box, except two of them that you’ll save for extra cards and pens. If you need help coming up with categories, I’ve included a few examples below:
- Chicken recipes
- Beef recipes
- Pork recipes
- Seafood
- Meatless/Vegetarian
- Crock pot or Instant Pot meals
- Soups
- Salads
- Pasta
- Healthy recipes

And don’t forget one to keep pens and one to keep extra cards. Or you can keep these in a junk drawer nearby, but I personally love having them all together!

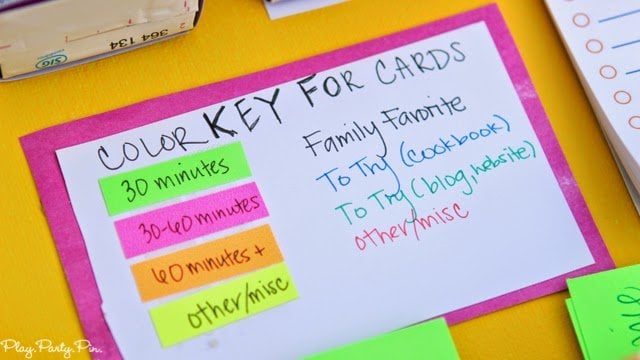
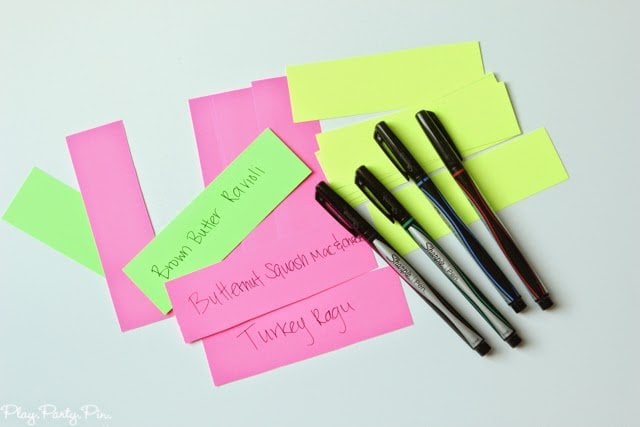
Now it’s time to come up with your color-coding system for your index cards. Most colored index cards come with packs of four colors, so I personally did four different lengths of meals.
You can choose whatever you want your meal types to be but here are some ideas:
- Slow cooker (meaning it’ll be a longer meal)
- 1 hour+
- 30-60 minutes
- Under 30 minutes
Write down a color key for your cards along with a sample of each of the colors to create a key for your board. I just used a white index card on top of a pink one.
Having the color key helps you to pick out a recipe that fits best for that day since you know how much time you’ll have to cook.
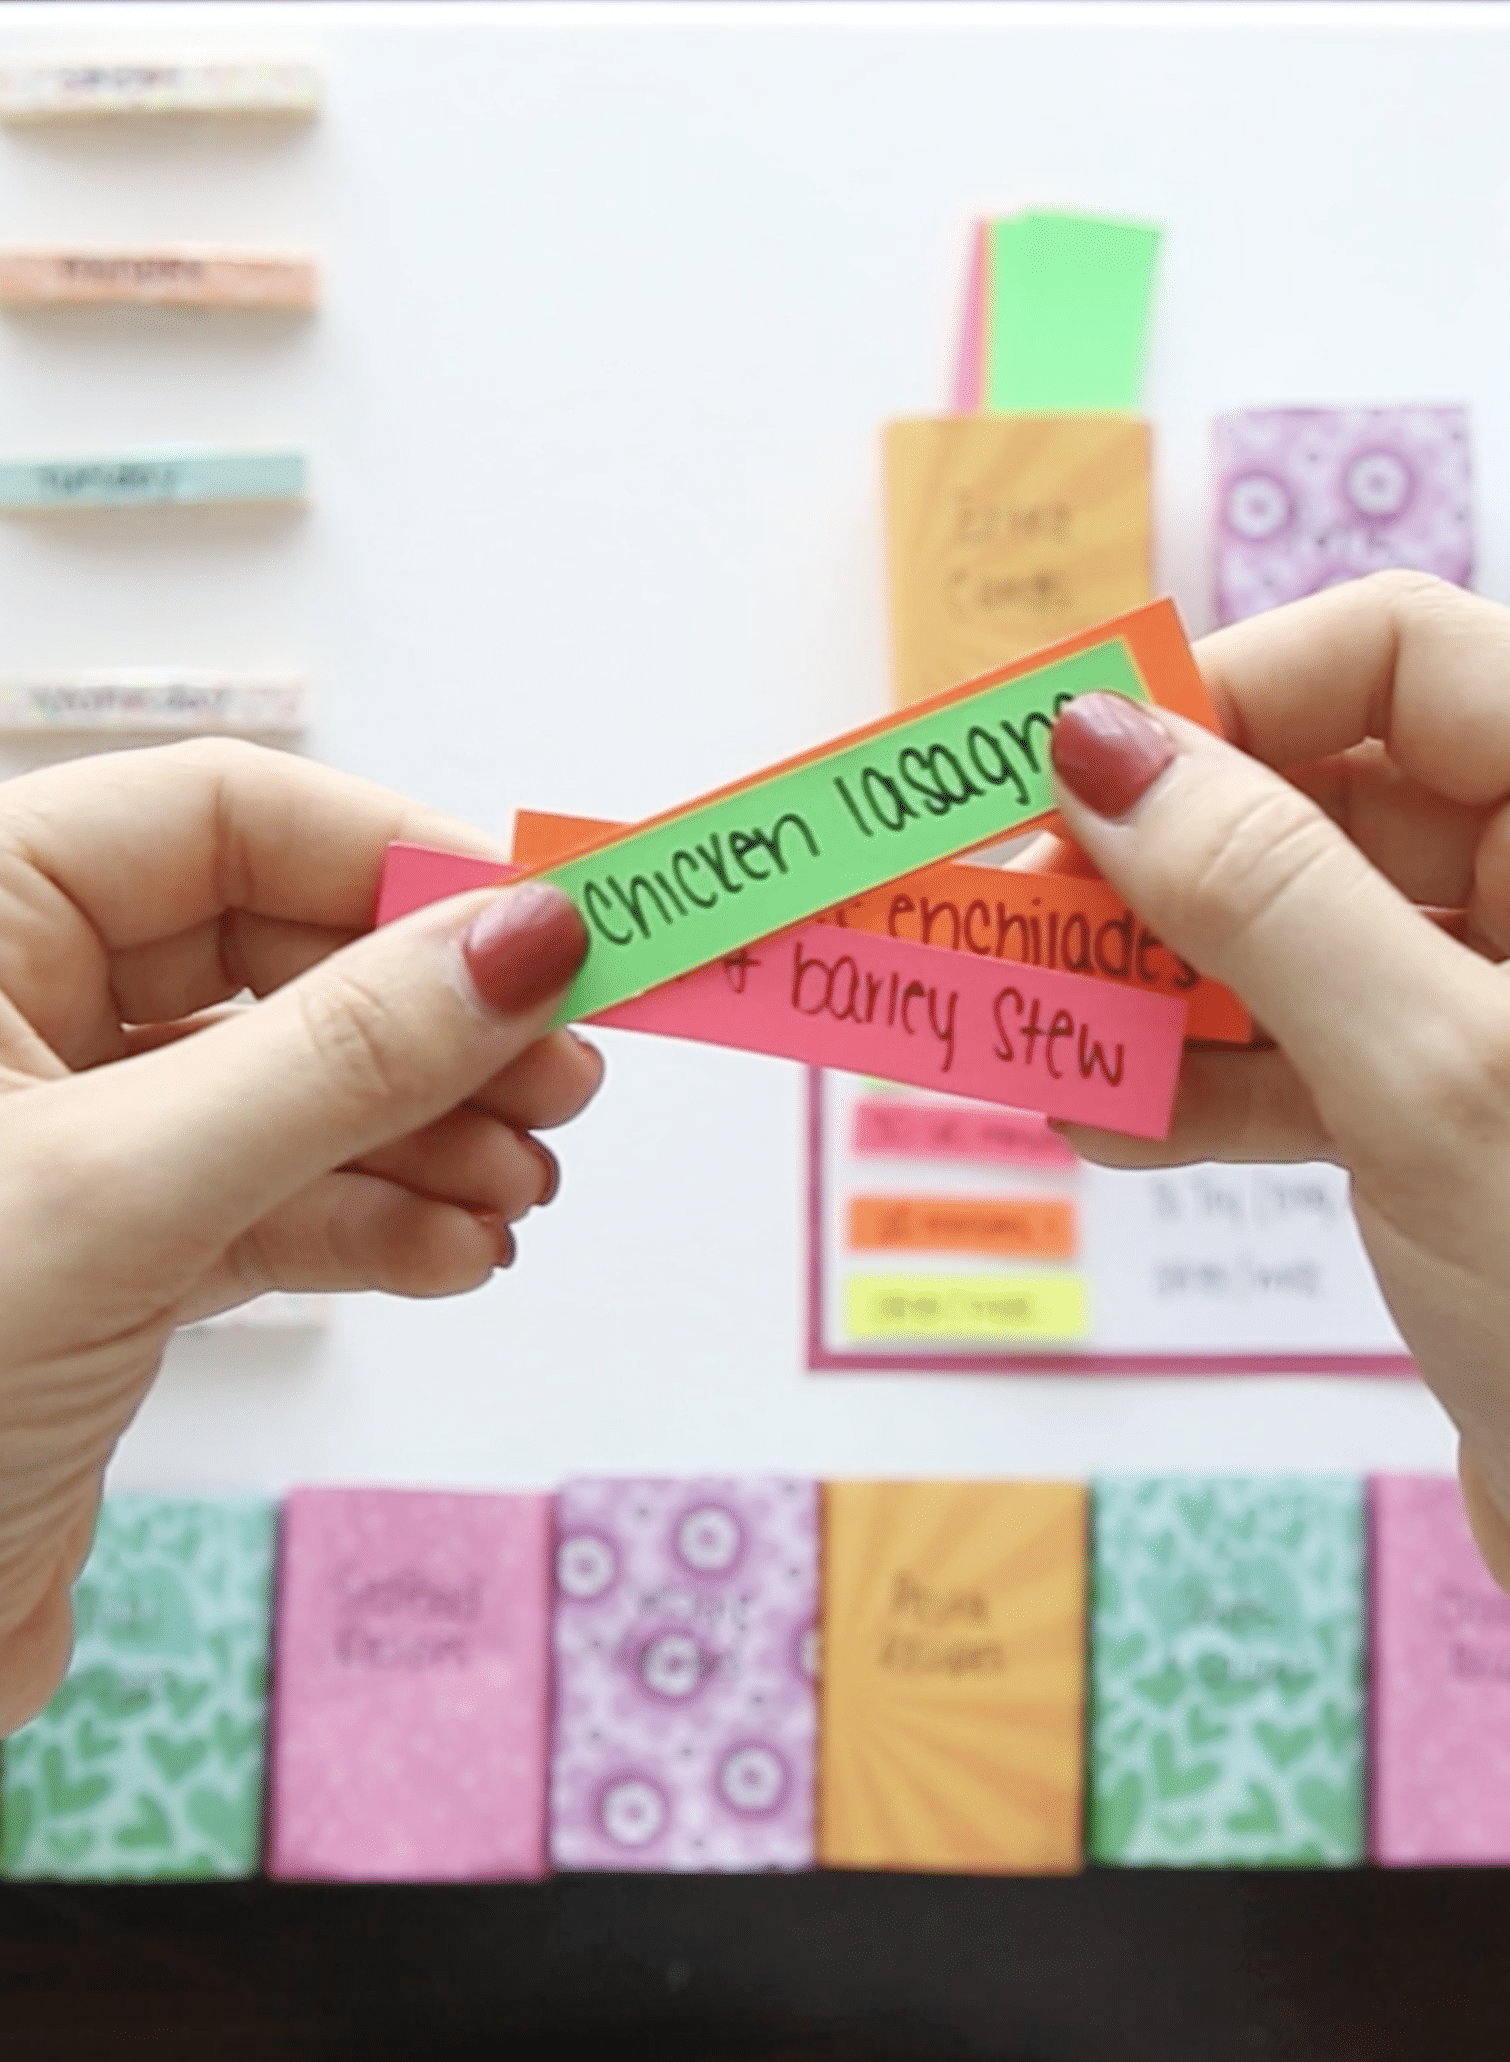
Next, cut your index cards into three. You’ll use these as your recipe cards and they fit best on the clothespins and in the juice boxes when the cards are cut into thirds, so they’re about 1″ wide.
Once they’re cut up, it’s time to start brainstorming meal ideas. If you need some ideas, I’ve got tons of great ideas on my recipes page!
Write down the name of the recipe on the front and if it’s not something you know exactly where it is, write down where to find it (URL, cookbook and page #), on the back.
That way you don’t have to waste time trying to remember where you found the idea when it’s time to cook.
I also like to write key ingredients that I won’t have in my pantry on the back of the card for creating my shopping list each week. Things like heavy cream for this Instant Pot fettuccine alfredo and pepperoni for pizza loaf.
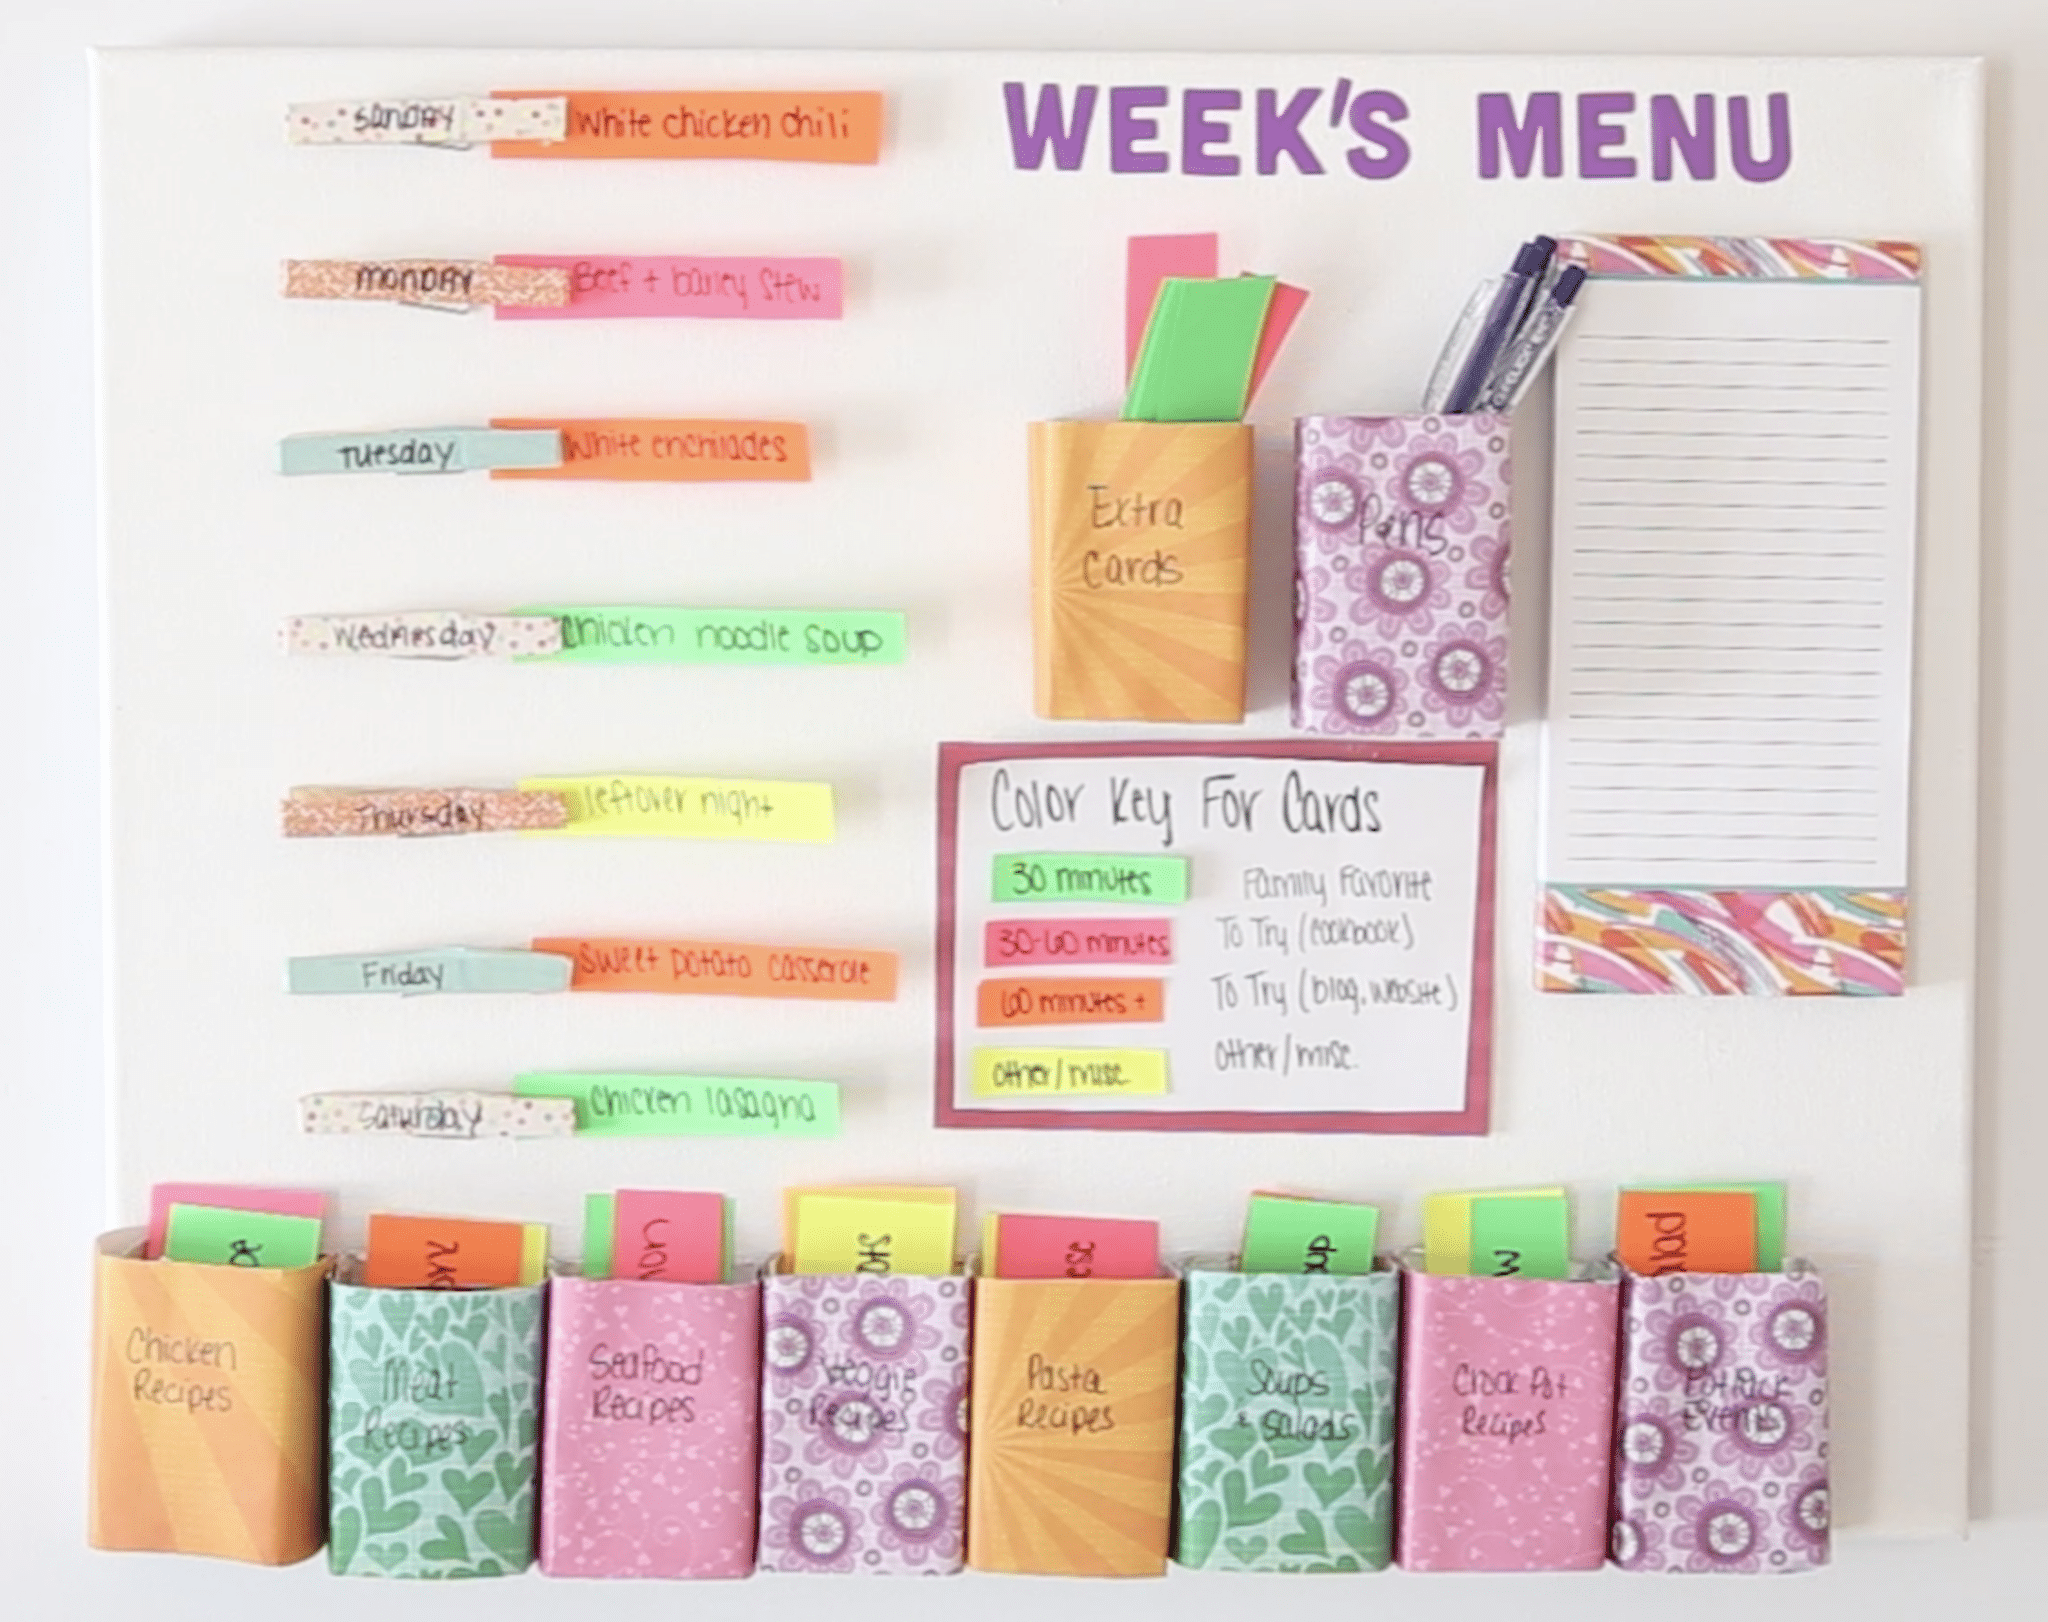
Last but not least, glue everything to your board with the hot glue gun. You can organize it however you see fit, but you can see how I laid it all out in the photo below.
Juice boxes with recipe ideas across the bottom, meal plan clothespins across the left side, shopping list on the right, and the supplies and keys in the middle.
Everything all in one place, easily accessible, and easy to use for our meal planning each week. I still use these meal planning tips but now with this menu board.

Hang it up wherever you’ll see and use it in your kitchen for the entire family to see. That’s one of the reasons I used color – I love the added pop of color on our otherwise white door.
Now at the beginning of each week, just pull out the recipe cards (I like to do it one category at a time) and choose what you want to make and when.
Any new recipes you came across during the week can be written on the extra cards and added to the appropriate category!

Expert Tips
Don’t double up your categories and your color-coding, meaning don’t put something like slow cooker recipes in both places.
Don’t wait to make the board until all your recipe cards are written. The idea is that you can constantly be adding more meal ideas to the board so just get the board done and add recipe cards as you go.
Make it a family project. Let kids help choose colors, meals to go on the cards, and even help put things together. They’ll be more likely to want to help with meals and even eat meals if they’re involved in the planning.
Project FAQs
How many juice boxes do I need?
I personally used ten juice boxes but if you’re using a smaller or larger canvas, you may be able to fit more or less. This. also depends on how many different categories you want to use.
What do I do with a card after I make a recipe?
This is totally up to you. You can either tape a plastic bag to the back of the board and put any used recipes in there until you’ve gone through all of them. Or if you like to repeat recipes, you can just put it back in the category it belongs in and eat it again!
How do you hang it up?
The board is pretty light since you’re just using empty juice boxes and paper. I just used a 3M command hook to hook mine to the back of my pantry.
More DIY Projects
- DIY Photo Wall – tips and tricks for creating the perfect gallery wall featuring your family photos!
- DIY Labels – organize your pantry, closet, or any other space with this simple tutorial for creating your own custom labels!
- DIY Field Goal – the perfect craft for a football party, make a simple field goal out of just PVC pipe and paint!
DIY Menu Board
Ingredients
- 1 2×3 canvas
- 10 juice boxes emptied, rinsed, and dried
- scrapbook paper cut into 4″ strips
- 7 clothespins
- washi tape
- colored index cards
- double-sided tape
- grocery list or small notepad
- Vinyl, stickers, or paint and stencils
Instructions
- If you’re going to paint your canvas, do that first and let it dry while you work on the other items.
- Add a strip of washi tape to each of the clothespins then write the days of the week on top.
- Cut strips of scrapbook paper and tape them around the juice boxes.
- Write recipe categories to the outside of the juice boxes – things like chicken, beef, soup, and pasta.
- Figure out what you want each color of your index cards to indicate. You can do types of recipes (e.g., kid-friendly, adult, healthy), time (e.g., under 30 minutes, slow cooker), or anything else. Use this indicator to create a key showing the color-coding.
- Cut your index cards into thirds so they are about 1″ wide.
- Add recipe names to the front of index card pieces. Flip over and add the source (e.g., website, cookbook) and any key ingredients you’ll need for the recipe.
- Glue everything in place on the board including the juice boxes, clothespins, extra boxes, and grocery shopping list.
- Hang the menu board where you’ll regularly see and use it.
Tips & Notes:
Want More Fun Ideas?
Want more fun ideas like this one? Enter your first name and email address in the form below to join the Play Party Plan community! You’ll receive weekly recipes, party ideas, games, and more directly to your inbox!


Leave a Reply