
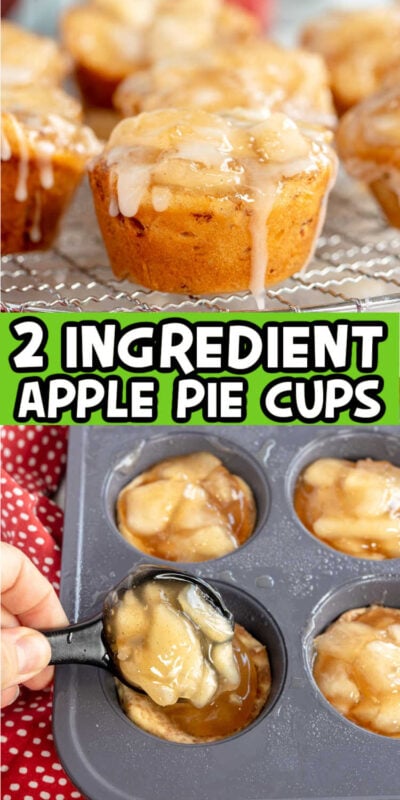
These 2-ingredient apple pie cups are so easy to make and so delicious! They taste just like little mini apple pies with the hint of cinnamon! Take it up a notch and top them with some caramel sauce or just enjoy them on their own for a delicious fall breakfast or treat!


Want to save this recipe?
Enter your email below and we’ll send this idea straight to your inbox (plus you’ll receive fun weekly ideas from us too!)
The fall is here! Our weather is cooling down, pumpkins (and skeletons – hello Halloween) are popping up on porches everywhere, and the smell of apples is already in the air. I just love apple season!
I just got back from a trip to Disneyland for Halloween and let me tell you, I am ready for all things fall at this point!
These apple pie cups are a super fun and easy fall dessert (or breakfast) that only take 2-ingredients you can get at any local grocery story. It’s a bite-sized treat full of yummy apple pie flavors!
This simple recipe is a great addition to an apple party, a fall brunch, or really any time you just want to enjoy the fall flavors of cinnamon and apples! You could even make up a batch and tie them up with some of these cute apple gift tags for a fun neighbor gift idea!
If you like apples, traditional apple pie, or even just cinnamon rolls – you need to try these cinnamon roll apple pie cups! They’re also a huge hit with guests of all ages, especially during the fall! If you don’t like apple pie, I recommend trying this caramel apple dump cake instead!
Why You’ll Love This Recipe
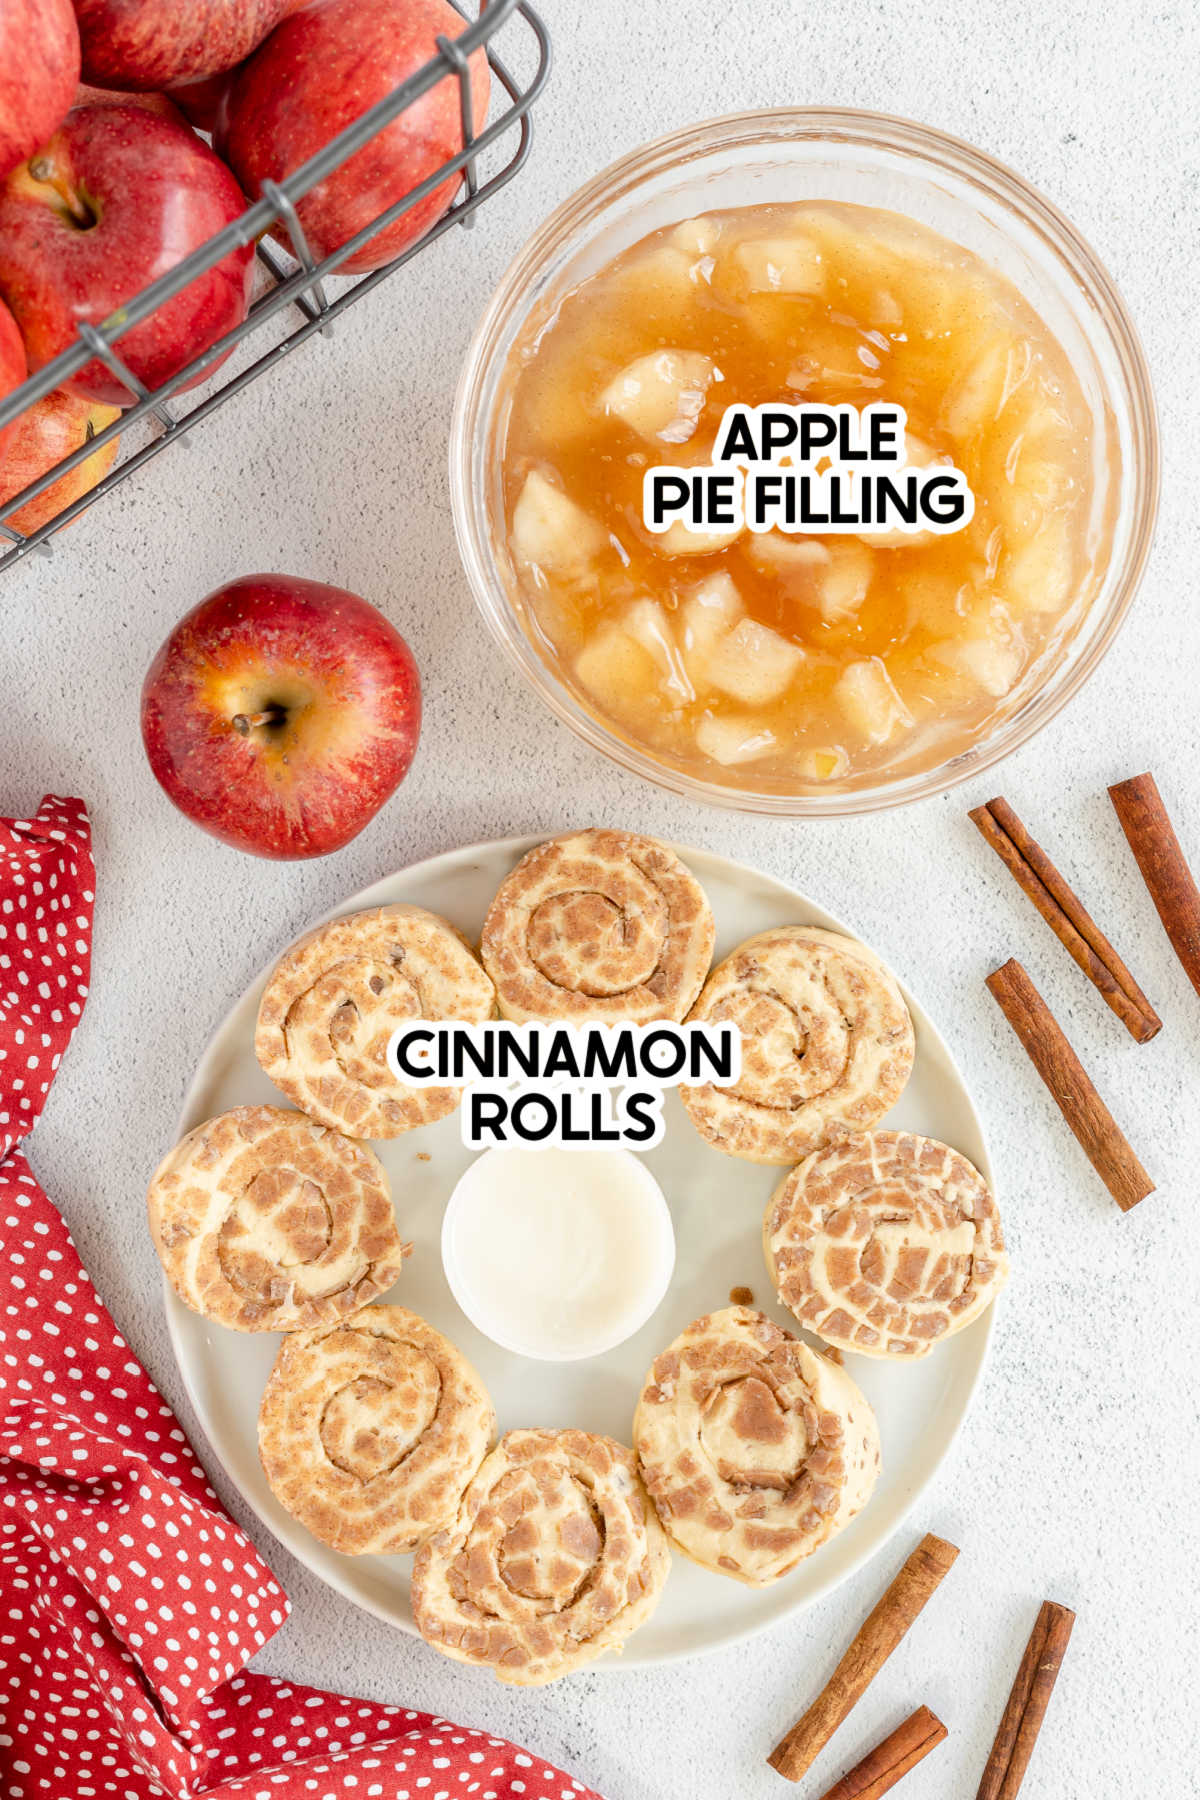
- 2-Ingredients – like I mentioned before, you just need two things for these – pre-made cinnamon rolls and apple pie filing. I’ve included some tips to take these above and beyond the norm but the base recipe is just those two ingredients!
- Easy – not only do they only use two ingredients, you don’t even have to do anything complicated with those ingredients. These are easy to make and pretty hard to screw up! Plus, the total time to make these is under 20 minutes from start to eating!
- Versatile – you really can make these little pies for any meal of the day – breakfast, brunch, snack, or even dessert! That’s my kind of dish!
Ingredients
Ingredient Notes
- Cinnamon rolls – make sure to get a can of just the standard cinnamon rolls, like the Pillsbury ones. You want the small ones that come in an 8 count package, not the big fluffy ones that you’d use for the viral TikTok cinnamon rolls! You can get either one or two cans!
- Apple pie filling – any type of canned apple pie filling works or if you want to be real ambitious, you can make your own homemade apple pie filling and use that instead.
- Caramel sauce – if you want to amp up the flavor on these and turn them into caramel apple pie cups, you can also get some caramel sauce or caramel ice cream topping. This is totally optional but a fun upgrade!
How to make apple pie cups
These really couldn’t be easier to make – way easier than making this homemade apple pie with the perfect flaky pie crust. And a similar flavor!
Preheat your oven to 375°F and grease (or spray with nonstick cooking spray) eight cups of a muffin pan. If you want to double this recipe, you can use two cans of cinnamon rolls and do 16 cups of a muffin tin instead – you’ll still only need one can of apple pie filling!
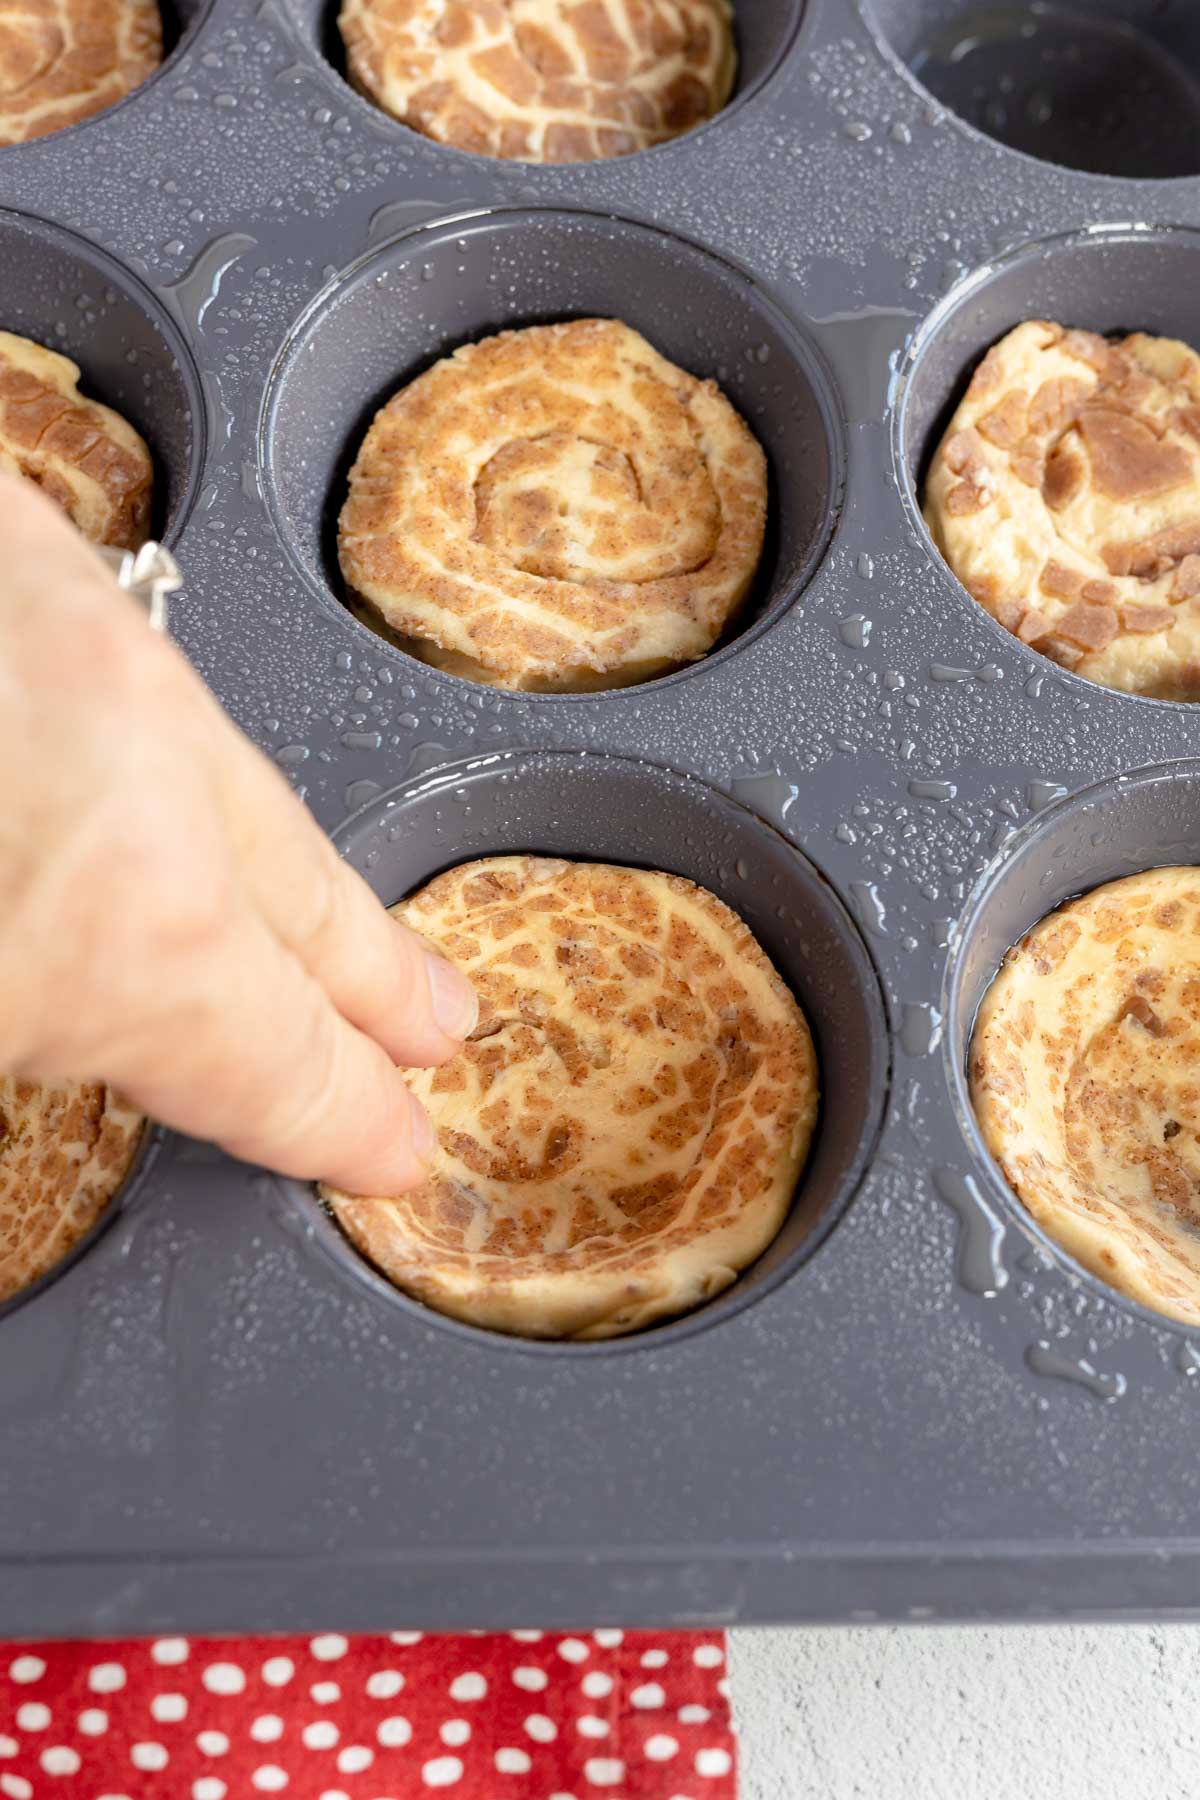
Separate the cinnamon roll dough and press one cinnamon roll into each of eight greased muffin tin cups.
Press them down gently so they cover the bottom of a regular muffin pan and then also press them up into the sides so you get the shape of a cinnamon roll cup. You want them to be little cups for the filling to go into.
Now add about two tablespoons of apple pie filling to each muffin tin on top of the cinnamon roll dough. It may seem like a lot but a good amount of the filling actually bakes into the cinnamon roll, so it’s not a lot once baked.

Put the muffin tin in the oven and bake for 15 – 18 minutes, or until the rolls are golden brown.

Remove from the oven and allow to cool for five minutes then remove from the pan and place on a wire rack to cool. While cooling, drizzle with the icing that came with the cinnamon rolls. You can serve any excess icing with the apple pie cups for dipping!

If you want to get even fancier, you could drizzle with a little caramel as well! It’s a great way to give these apple cups even more flavor!
Or just stick with the icing that comes with the cinnamon roll package, and they’ll be delicious regardless!
These are good warm or at room temperature and really good topped with a small scoop of vanilla ice cream but let’s be honest, what’s not better with ice cream!?!

Make Them Mini
If you want to make mini apple pie bites, you can also make these in a mini muffin pan. Just use a round cookie cutter to cut smaller bite-size cinnamon rolls and do two teaspoons of apple filling on top instead! They’re like easy mini apple pies, a fun bite-sized twist on the original!
Expert Tips
Press the cups down gently and make sure to really get a good cup shape so the apple pie filling has somewhere to go. If you just press them down into the bottom of the cup but not the sides, you’ll end up with just a mess of apple pie filing on top of a cinnamon roll.
Store in the refrigerator in an airtight container for up to three days. These are definitely best enjoyed warm and immediately (that’s why I typically only make eight) but they store and reheat okay.
Keep any leftover apple pie filling in an airtight container or jar in the refrigerator. Or use it for other delicious apple treats like this caramel apple dump cake.
Let the apple pie cups cool for a few minutes before adding the icing (and caramel) or the icing will just slide right off. You could also brush the icing on with a pastry brush rather than drizzling it.
Use a silicone spatula to help pop the cinnamon roll crust out of the muffin cup once they’ve cooled slightly. Sometimes they’ll stick if you just try and pop them out, even if you’ve sprayed and greased the cups correctly! It’s just an easy way to make sure they don’t fall apart.
Recipe FAQs
What kind of cinnamon rolls should I use?
The best kind of cinnamon rolls to use are the 8 count Pillsbury cinnamon rolls with original icing. They’re the ones that don’t really pull apart (so not like normal cinnamon rolls) but still give you that great cinnamon roll flavor!
Can I use fresh apples?
If you’d prefer to use fresh apples, you can make your own homemade apple pie filling instead of using canned. If you’d like to do that, check out the ingredient list in the post above for my tips.
Can you freeze apple pie cups?
I do not recommend freezing these apple pie cups. They don’t thaw with the same texture as they originally bake.

More Easy Apple Recipes
If you like apples, you have to try these other yummy apple recipes after you’ve finished making these mini pies!
- Spiced apple cider – a delicious warm drink full of slightly spiced apple flavor!
- Easy apple crumble – a super simple apple crumble recipe that uses fresh apples and lots of crumbly topping!
- Caramel apple bar – a fun fall dessert bar with lots of great caramel apple toppings to try!
- Caramel apple bark – a 4-ingredient recipe that takes caramels to the next level in simplicity and flavor!
- Caramel apple dip – the best caramel apple dip made with cream cheese, caramel, and toffee bits!

Apple Pie Cups
Ingredients
- 1 can 8 count refrigerated cinnamon rolls
- 21 ounces canned apple pie filling
Instructions
- Preheat oven to 375°F and grease 8 cups of a muffin pan.
- Separate the cinnamon roll dough and press one section into each of 8 greased muffin tin cups.1 can 8 count refrigerated cinnamon rolls
- Add about 2 tablespoons of apple pie filling to each muffin tin on top of the cinnamon roll dough.21 ounces canned apple pie filling
- Bake for 15 – 18 minutes, or until the rolls are golden brown.
- Remove from the oven and allow to cool for 5 minutes then drizzle with the icing that came with the cinnamon rolls.


Leave a Reply